In this article, we will show how to use the AREX traffic replay feature with a simple application that implements bookstore generated orders.
AREX is an open-source testing tool that provides test case management and traffic replay without code intrusion.
This tutorial will be focusing on the traffic replay function of AREX. The tested application is based on the official community-test application with some functional extensions, and implements a simple function of bookstore order generation, generating an order of one book for a specific user, during which the price of the book is calculated according to the marketing policy, and the corresponding inventory deduction service is also called. It also calls the stock deduction service to deduct the corresponding book's inventory.
The service provides two interfaces: order (order generation) and updateInventory (inventory deduction), where order calls updateInventory during execution.
Conclusion
The trial conclusions are given first:
- Management of test cases: overall similar to Postman, provides most of the features of Postman, such as: scripts, environment variables, WorkSpace, etc., which are not covered in this demo.
- The traffic replay function without code intrusion: the core principle can be found in the official presentation provided。
- The capability of data collection and automatic Mock is very powerful, supporting fully automatic Mock of Http service, database, Redis, local cache, and current time. In-memory data mocking is also supported through configuration.
- The validation of data written to the service is well-supported, for example, the order service has all dependencies mocked during testing, so there is no need to worry about generating dirty orders. Moreover, even with mocking, the order results can be verified (for example, the SQL written to the order database can be compared with the SQL in the test case).
- The validation point is better, not only the service response is validated during testing, but also the output data, such as data written to the database, Redis, and requests sent to external services can also be validated.
- Disadvantages: For more complex applications, since the results are verified by full comparison, some configuration is needed to reduce the noise of the results for a better experience.
Quick Installation
There're two modes to run AREX, which are described below.
Standalone Mode
Standalone mode refers to the mode that AREX runs independently in the local environment, which can also be called command line mode. It's very easy to use. Download the arex-standalone-all.zip file from https://github.com/arextest/arex-standalone/releases and run arex-cli.bat(sh) directly, it will list the Java services running on the current machine. Select the corresponding service, and the tool will automatically attach the Agent to the target service, as follows:
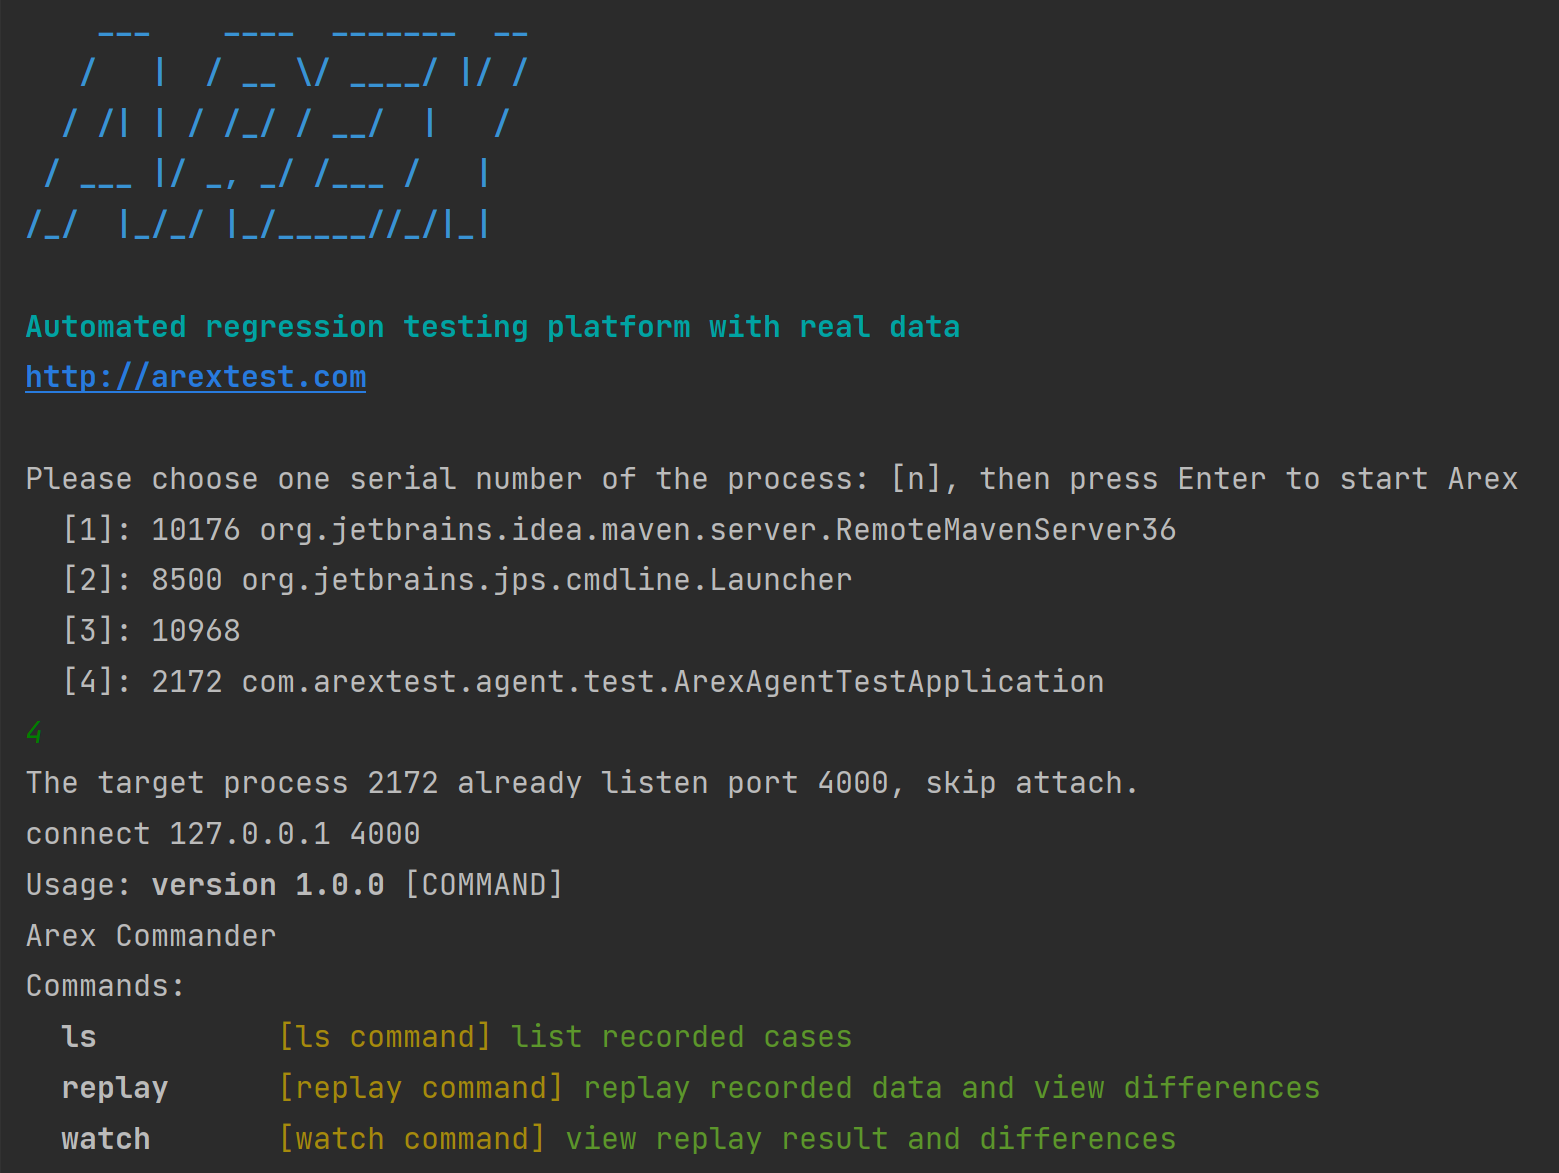
There are several main commands:
ls: List the test cases already recorded on the target service. There is no data when it starts, you need to send some requests to the service and then execute the command.

replay:Replay the recorded test cases on the target service and show the results of the replay. The execution results will be displayed in a newly opened window.
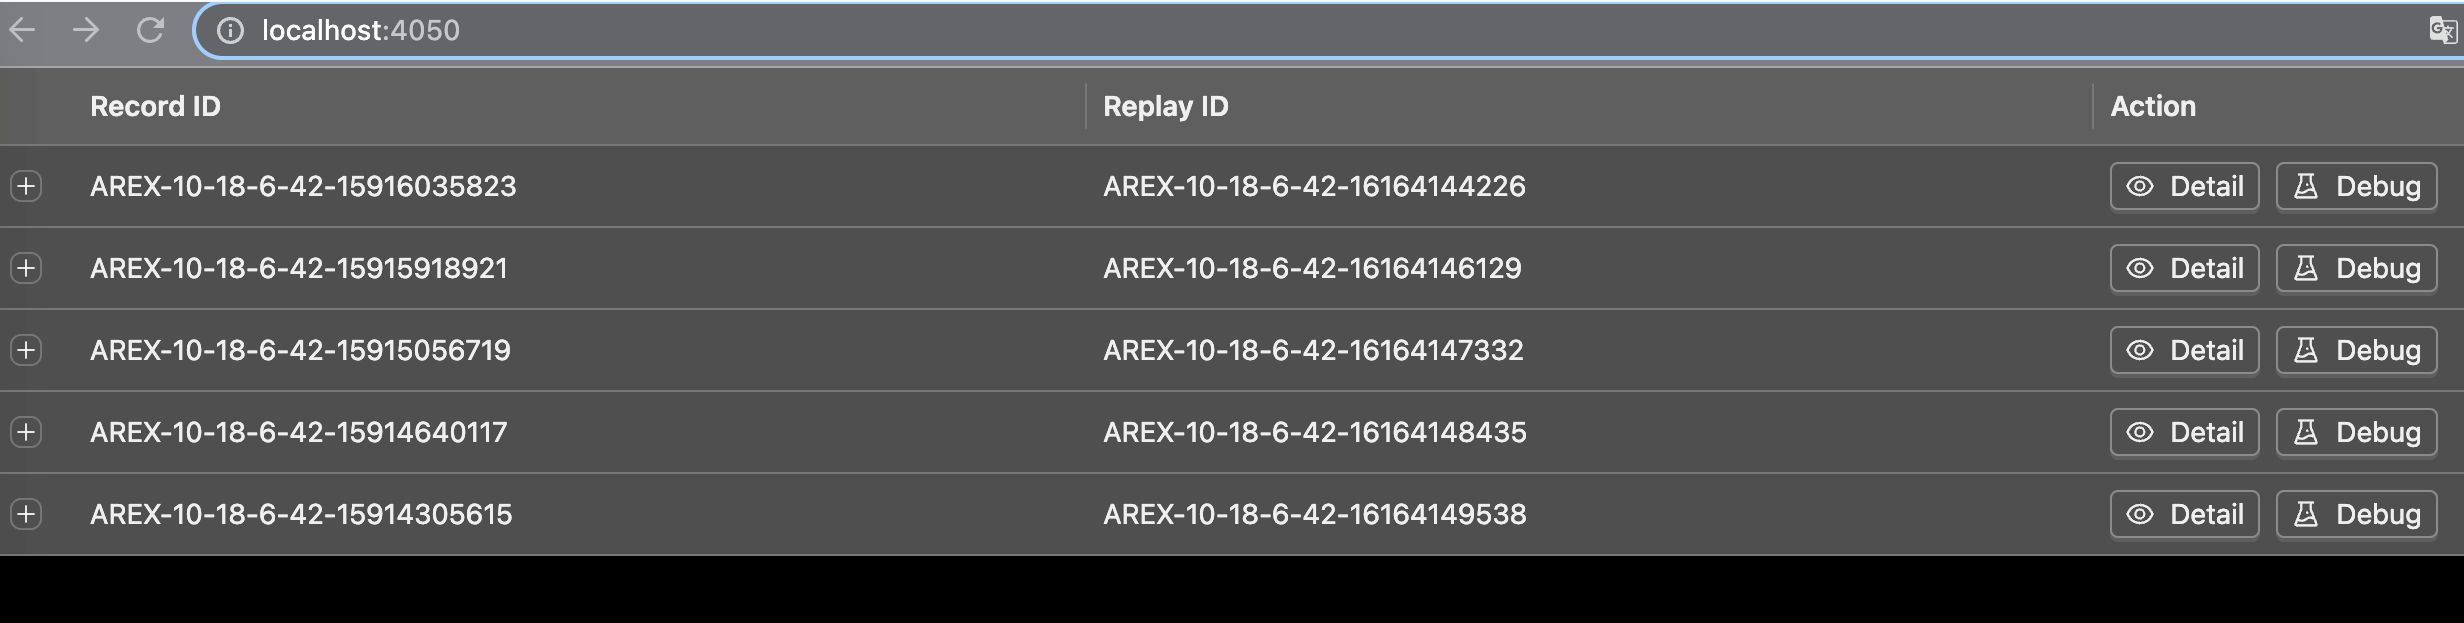
Clicking the Detail button will display the execution result corresponding to the test case, as well as all the data collected during the process. Taking the inventory deduction interface as an example, all the relevant data in the process have been collected.
The response:

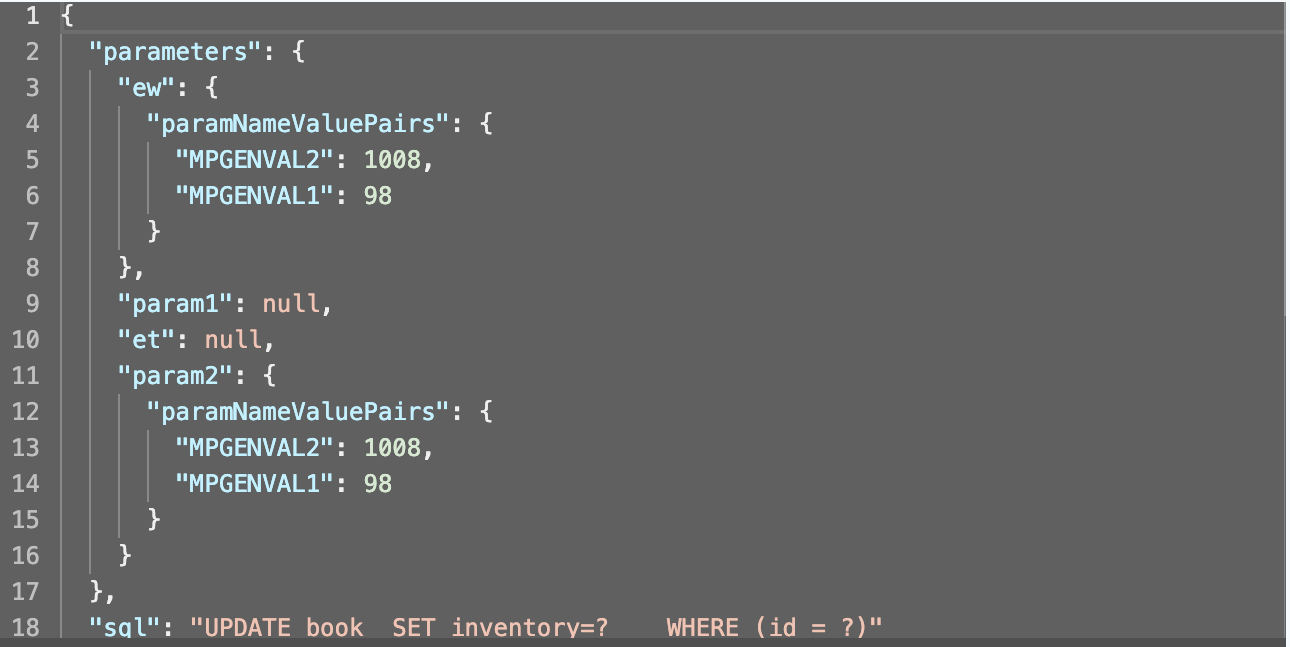
Access database to update inventory:
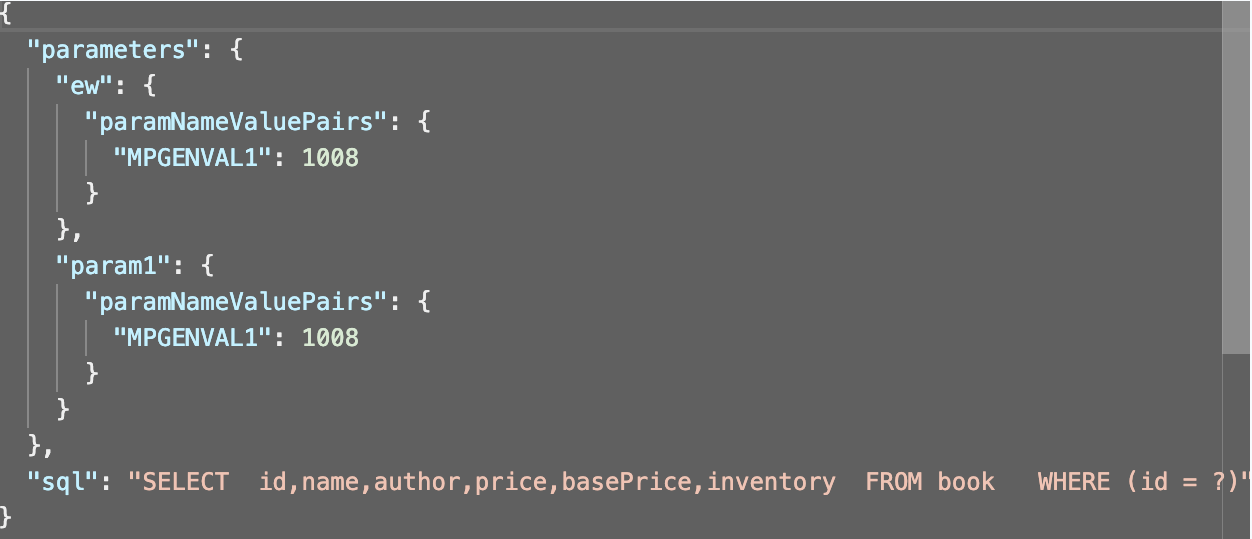
Access database to obtain detailed data about the book:
If the execution fails and the cause of the failure cannot be easily determined, you can click the Debug button to directly debug code. This function can be understood as sending the collected requests to the local service, so that code debugging can be performed in the IDE. When the request is executed, the services and databases relied on by the application itself will not be truly accessed, but mocked with the collected data.
watch: A complementary command to replay that allows you to view the history of execution.
The Standalone mode is very easy to use, but does not independently support some more complex features, such as mocking local cache and time. Therefore, this mode is more suitable for developers to perform a quick local validation or local debug troubleshooting after discovering issues before submitting the test.
Standard Mode
The Complete mode provides a UI interface and requires the installation of some associated services. Please refer to the installation document. After installation, the login interface is as follows:
In order to use the traffic replay feature, the Agent needs to be loaded on the tested service in advance.
Execute the following command to clone and package the Agent code, or download it directly from https://github.com/arextest/arex-agent-java/releases.
git clone https://github.com/arextest/arex-agent-java.git
mvn clean package
The corresponding jar package file will be generated under arex-agent-jar. Copy this folder to the root directory of drive D, and then run the following command locally to start the demo application. Replace x.x.x.x with the IP address of the previously installed Docker:
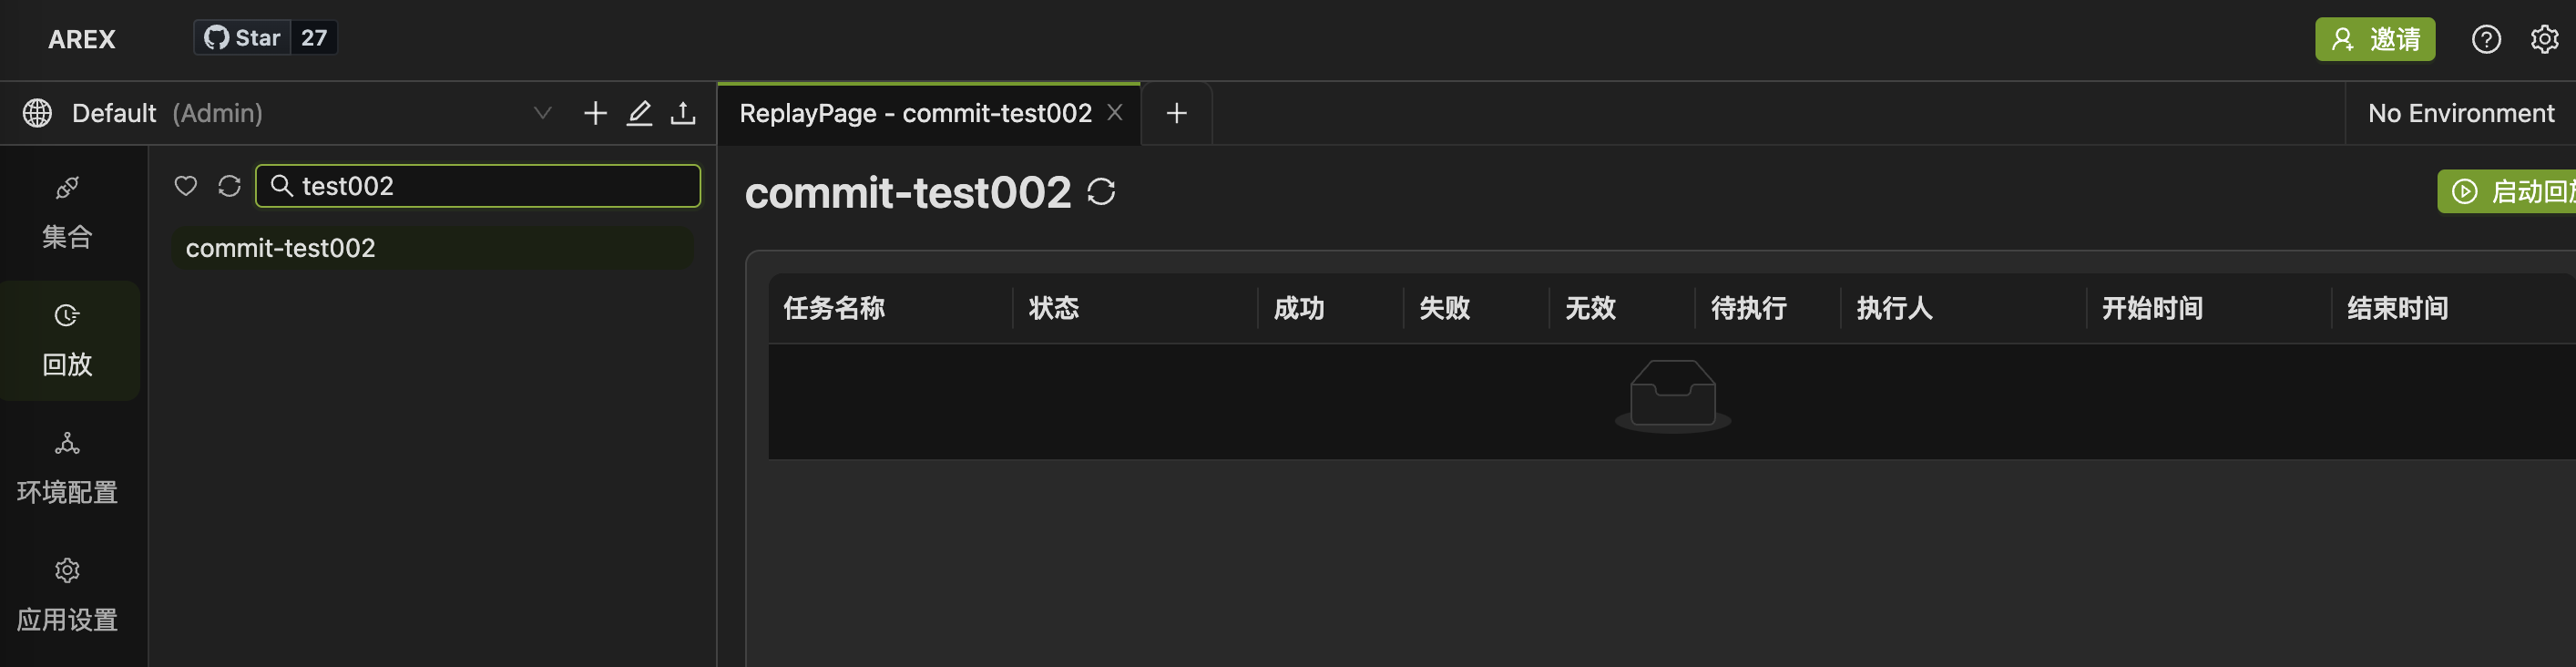
java -javaagent:D:\arex-agent-jar\arex-agent-0.1.0.jar
      -Darex.service.name=commit-test002
      -Darex.storage.service.host=x.x.x.x:8093
      -jar MyArexDemoService.jar
You can also download it directly from https://github.com/arextest/arex-standalone/releases, which contains the corresponding jar file.
Once launched, the application will automatically appear in the replay application list in AREX.
After an application with AREX Agent loaded is released, it will automatically collect real user requests based on the set recording frequency and save them. These saved data are used as test cases for subsequent playback to verify whether new code changes have unintended consequences.
Application Setting
A series of settings can be made in the AppSetting for the target application. In this case, only the recording-related settings are used, as shown below:
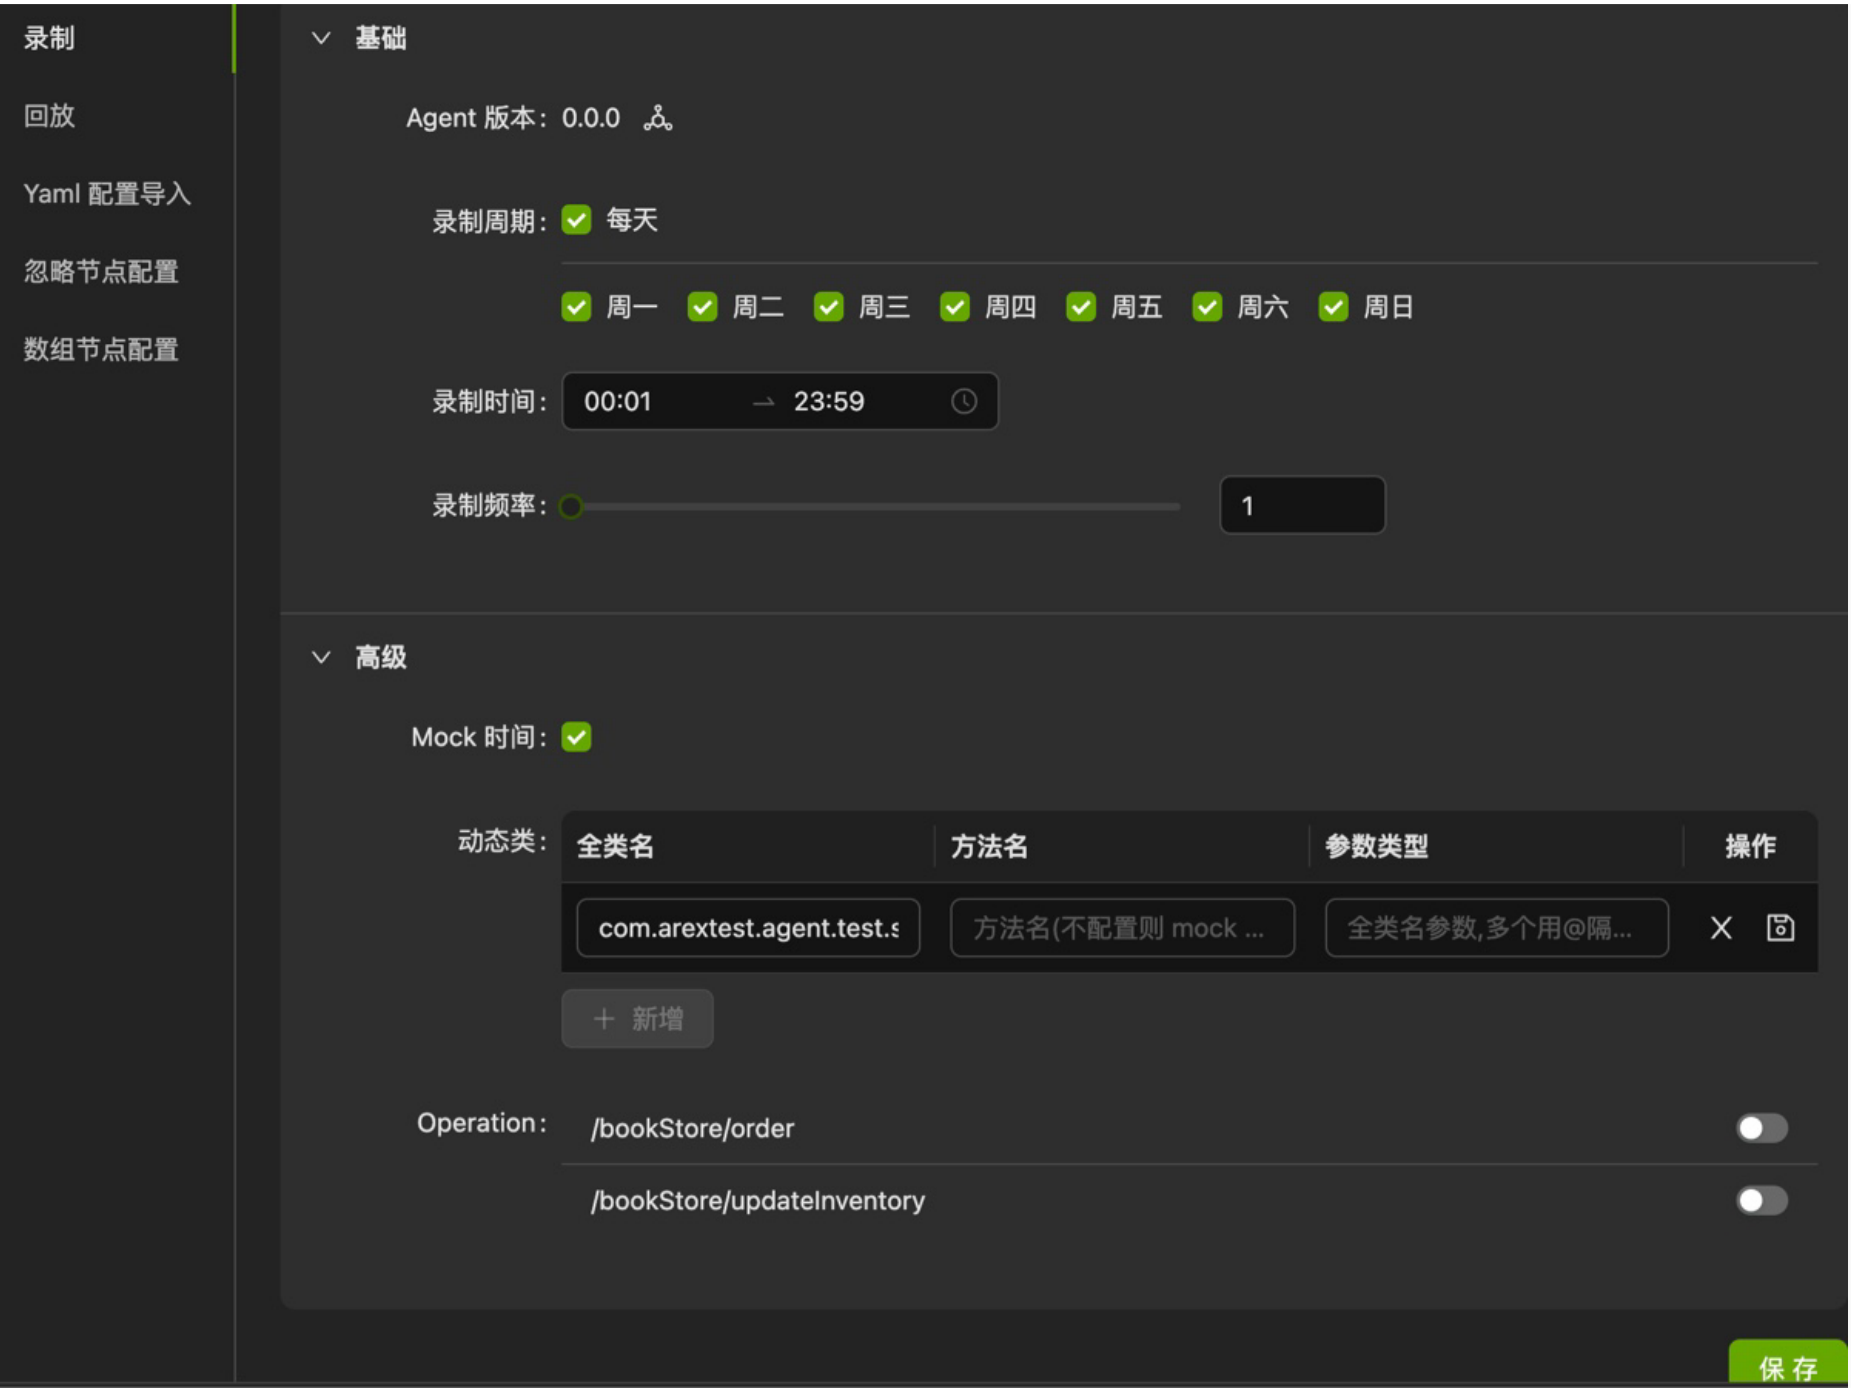
You can set the recording time and frequency here.
There is also an advanced menu below, where some feature-enhanced configurations are supported:
- Time Mock: When this feature is enabled during playback, the system’s current time will be restored to the time recorded in the use case (not by changing the machine time, but by mocking various time classes/methods in Java) to ensure stable execution of the use case.
- Dynamic Class: This can be understood as mocking memory data, mainly some cache data in memory, to avoid unstable test case execution caused by different environment data differences. The configuration method is somewhat complex and requires configuring the class name (required) and method name, parameter table, and so on, corresponding to the local cache. In this test service, a local cache of marketing policies is used, and the service calculates the sale price of books based on the marketing policies. Different data will affect the service’s response, so this configuration is also added. In other words, with this configuration, many preparation operations before executing the test can be saved, such as database, Redis, and configuration synchronization. Whatever data is relied on during use case recording is used during testing, and no other additional preparation is needed.
- Operation: You can enable or disable the recording function of a certain interface under the service. In addition, AREX also provides configurations such as ignoring nodes and comparing disordered arrays to improve the stability of test cases. The specific usage can be found in the official documentation.
Replay
After starting replay task in the replay menu (with the target replay environment set to the IP address and port number of the deployed test application), you will see the following execution records:

Select the replay task from the list, there will display a summary of the test results, showing the percentage of successful executions. The following is a list of one tested interfaces.

All the cases in this demonstration have failed, and clicking on DiffScenes will show the details of the failures:
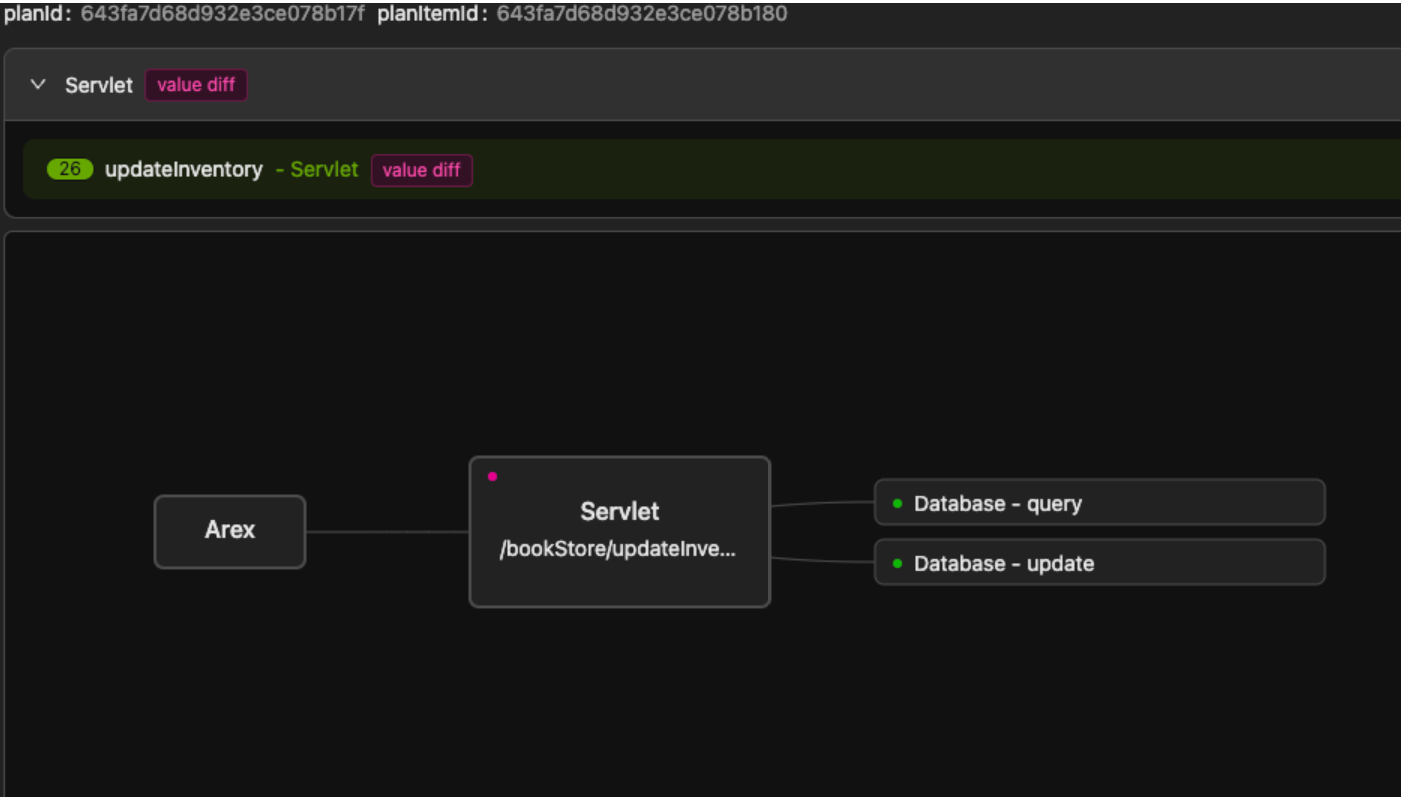
From here, it can be seen that all 26 cases were caused by different processing times returned by the service. Therefore, there is only one error card here. Clicking on the card will display a graphical interface showing the execution steps of the test case, with failed steps marked with red dots. To solve this failure, you need to enable the Time Mock function in the configuration, or exclude this time node in the configuration. The database query and update operations have passed. Clicking on any tab will display detailed data for the corresponding steps during recording and replay.
In the replay list, there is a CaseTable button next to the DiffScenes button. By clicking it, there will show a drawer page listing all the recorded test cases:

The Record Details button allows you to see the data details of the recorded test case, and the Save button allows you to solidify the test case and save it in the Request Collection menu.
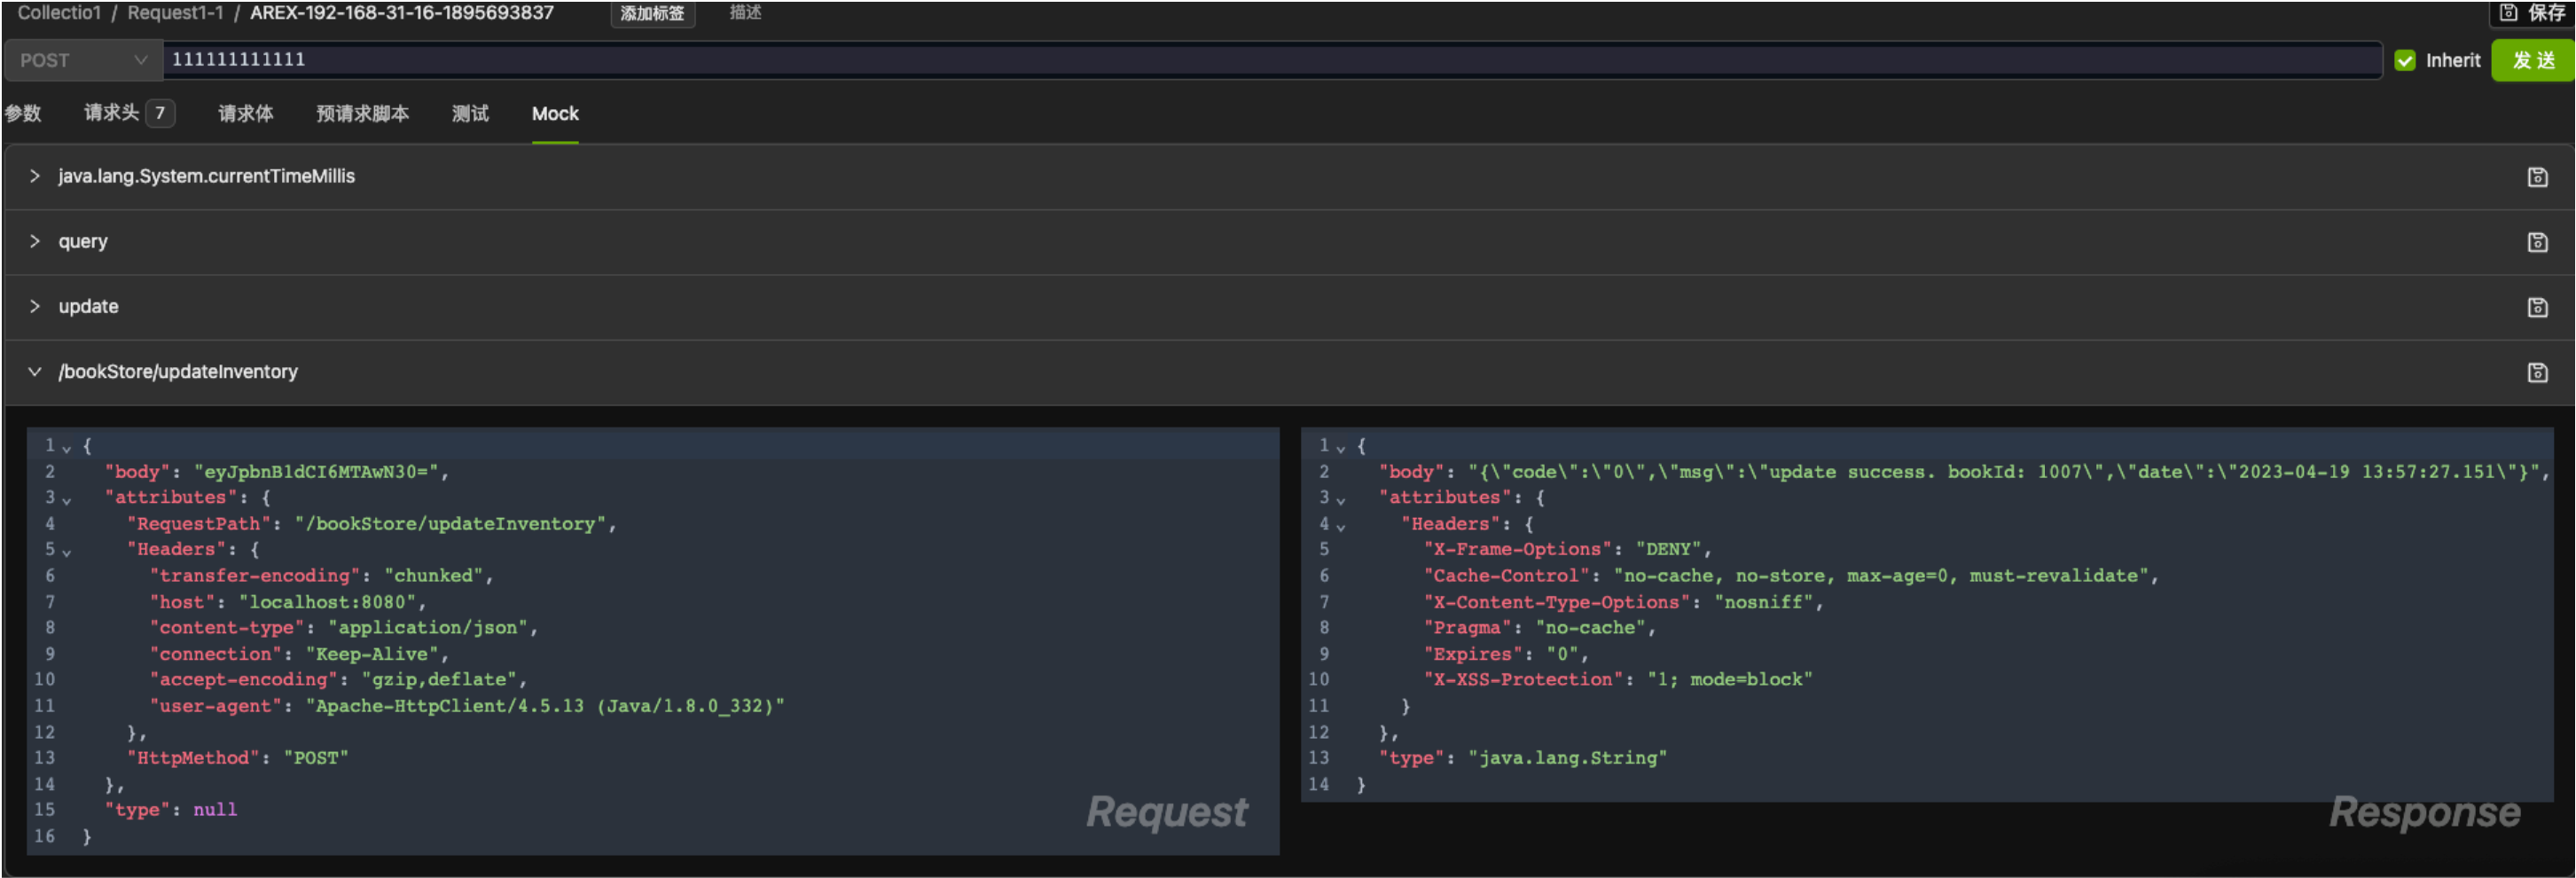
Here you can edit the saved Mock data according to your needs, or add scripts for richer validation.
Fast local reproduction of online issues
For some complex business applications, when problems occur online, they often cannot be reproduced locally by developers (due to unstable dependent services, inconsistent environment data, etc.). Relying on log debugging is also time-consuming and not very reliable. For developers, it would be best to be able to reproduce the problem locally and debug it directly.
AREX provides this feature. In the Collection menu, create a quick request and click the button in the following image to add a specific request header. Then send the request, and the request will be recorded online for future replay:

After the request is completed, clicking the save button at the top will automatically save the recorded results. The recorded data can perfectly reproduce the production environment and reproduce online problems. Changing the request address to localhost can send requests to achieve debugging locally.