Register Application
Traffic recording and replay is done by recording your live traffic and then reusing it(replaying) in the testing environment for testing the correctness of code logic.
It is often used for regression testing and has a number of advantages:
- Through recording traffic, with low cost in creating cases;
- Perfectly simulating user behavior by replaying real traffic from the production environment, avoiding the discrepancies that may occur from manual writing;
- Additionally, a more in-depth and fine validation of system logic can be achieved by comparing the recorded data and replayed data in an object-by-object manner;
- The recorded traffic is readily available for use, and does not require maintenance, making it extremely convenient.
Application Registration
Step 1: Create application
AREX Agent is the core component for implementing service recording and playback. To use the recording function, the Agent must be deployed in the tested application
Access the Visualization User Interface via Chrome browser.
Click on Replay to enter the replay page, and click "+" in the top left corner to create a new application. Enter the application name.

- After creating application, the startup parameters for the Agent of the application will be automatically generated as shown below.

java -javaagent:</path/to/arex-agent.jar> -Darex.service.name=21fdcdbf919eaae0 -Darex.storage.service.host=<storage.service.host:port> -jar <your-application.jar>
</path/to/arex-agent.jar>arex-agent.jar is the name of the jar package provided by AREX. Please note to modify the path accordingly.<storage.service.host:port>is the storage service host address, modify it according to the real situation.your-application.jar: the jar package of your tested service.- If you encounter conflicts between the AREX Agent and other agents (such as the OpenTelemetry Agent), you can resolve this issue by adding specific parameters to the startup arguments:In the event of conflicts with other agents, you can add multiple prefixes to the corresponding parameters separated by a comma (,):
-Darex.ignore.type.prefixes=io.opentelemetry
-Darex.ignore.classloader.prefixes=io.opentelemetry-Darex.ignore.type.prefixes=io.opentelemetry,other.agent.prefix
-Darex.ignore.classloader.prefixes=io.opentelemetry,other.agent.prefix - To view the Agent's logs, add the debug parameter: -Darex.enable.debug=true
Please copy and save this startup parameter, you will need this command to start up the Agent when deploying it later on.
The owner of a newly created app will automatically be set to the user who created it.
AREX Agent is the core component for implementing service recording and playback. To use the recording function, the Agent must be deployed in the tested application, see for Deploy AREX Agent.
Step2: Segmenting Traffic based on varying environments
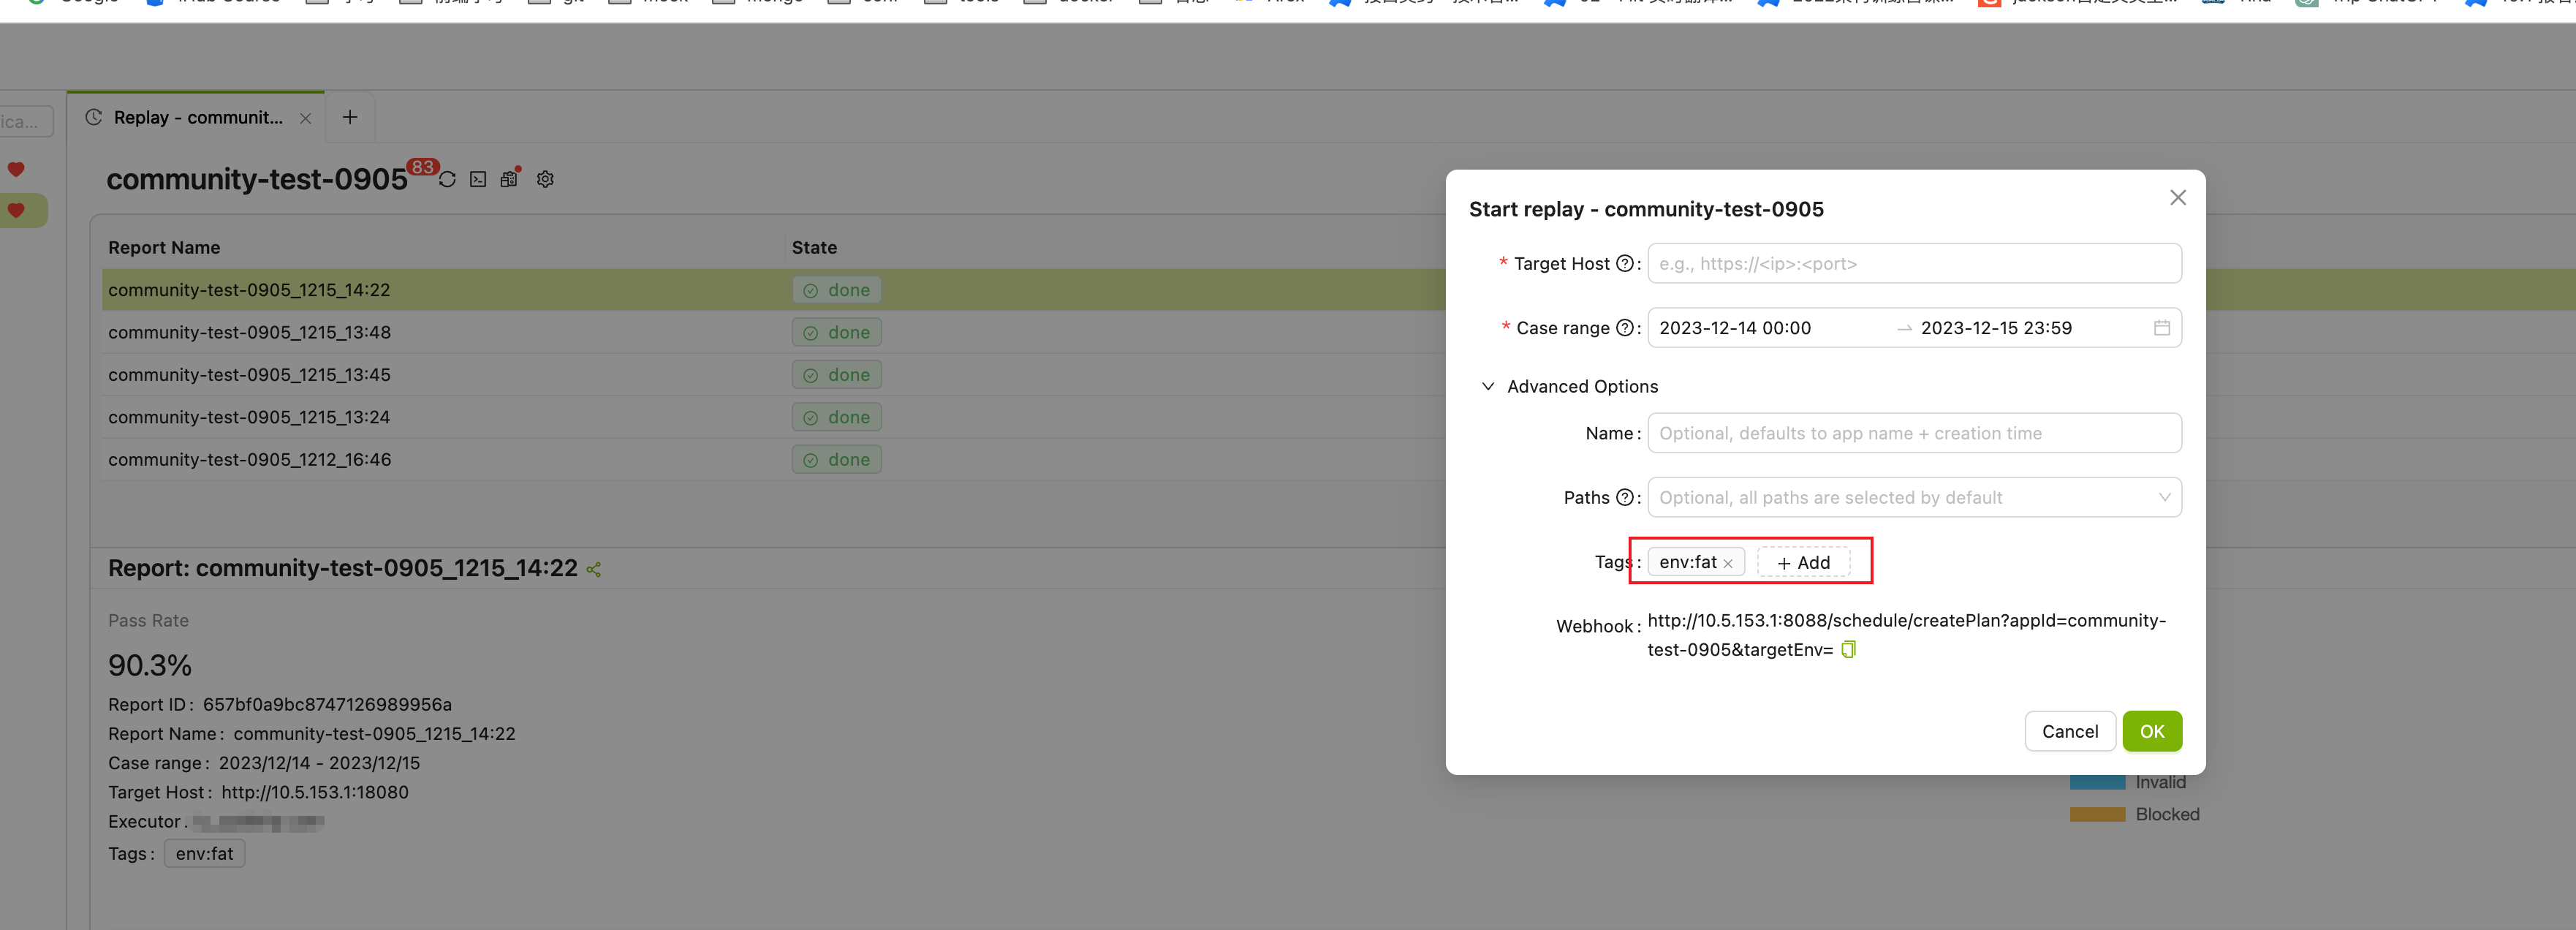
In AREX, you can add different environment labels for the recorded traffic. This is to help users flexibly filter and replay traffic according to the labels to meet the test scenarios of specific environments or requirements. For example, users can select the corresponding traffic for replay based on different environment labels to verify the performance and stability of the system in different environments.
To do this, you need to add the parameter: -Darex.tags.env=<xxx> to the Agent startup parameters, after which the recorded traffic will be automatically tagged with env:<xxx>.
Then, you can start tests based on different environment tags:
Step 3: Deploy AREX Agent
AREX Agent is the core component for recording and replaying applications and can be run by configuring -javaagent to dynamically inject the agent into the JVM.
The operation of AREX Agent depends on the Storage Service.(AREX storage service)。
Simply download the latest binary from GitHub or compile it with mvn clean package -DskipTests by yourself.
The arex-agent.jar is in the folder arex-agent-jar/ after the build process.
If you need these jar with version, you can add option: mvn clean install -DskipTests -Pjar-with-version
The AREX Agent can be deployed using various methods, including:
Configure Java Parameters
Paste the startup parameters of the Agent you just generated and run it to start the Agent to run the application:
java -javaagent:</path/to/arex-agent.jar> -Darex.service.name=21fdcdbf919eaae0 -Darex.storage.service.host=<storage.service.host:port> -jar <your-application.jar>
Deployment Configuration File
You can create a new configuration file arex.agent.conf as shown below:
arex.service.name=your-service-name
arex.storage.service.host=<storage.service.host:port>
Then configure Agent:
java -javaagent:/path/to/arex-agent-<version>.jar -Darex.config.path=/path/to/arex.agent.conf -jar your-application.jar
Set the Java options by using the JAVA_OPTS environment variable
You can deploy the AREX Agent on Tomcat by configuring the catalina.sh file or setting the JAVA_OPTS environment variable directly. Here’s an example of how to do this on Linux:
export JAVA_OPTS=-Djavaagent:/path/to/arex-agent.jar -Darex.storage.path=/path/to/arex.agent.conf
You can then run Tomcat as usual. The AREX Agent will be automatically injected into the JVM and run when Tomcat starts.
Once configured, you can access the AREX UI through Chrome browser, select the Replay tab, and then you will see your applications to be tested in the right-side.
By default, AREX automatically records all online traffic, but you can customize recording tasks in AppSetting.