This article explains how to deploy and configure AREX locally.
Background Information
AREX is an open-source automation testing tool based on Java Agent technology. It records real traffic in the production environment and replays it in the testing environment while performing intelligent comparison and analysis of the replay results, enabling quick and effective regression testing. In addition to this, it also provides a range of automation testing functions such as test case management, interface testing (script verification, dual-environment comparison), and more, making it a user-friendly automation testing platform that does not require programming skills.
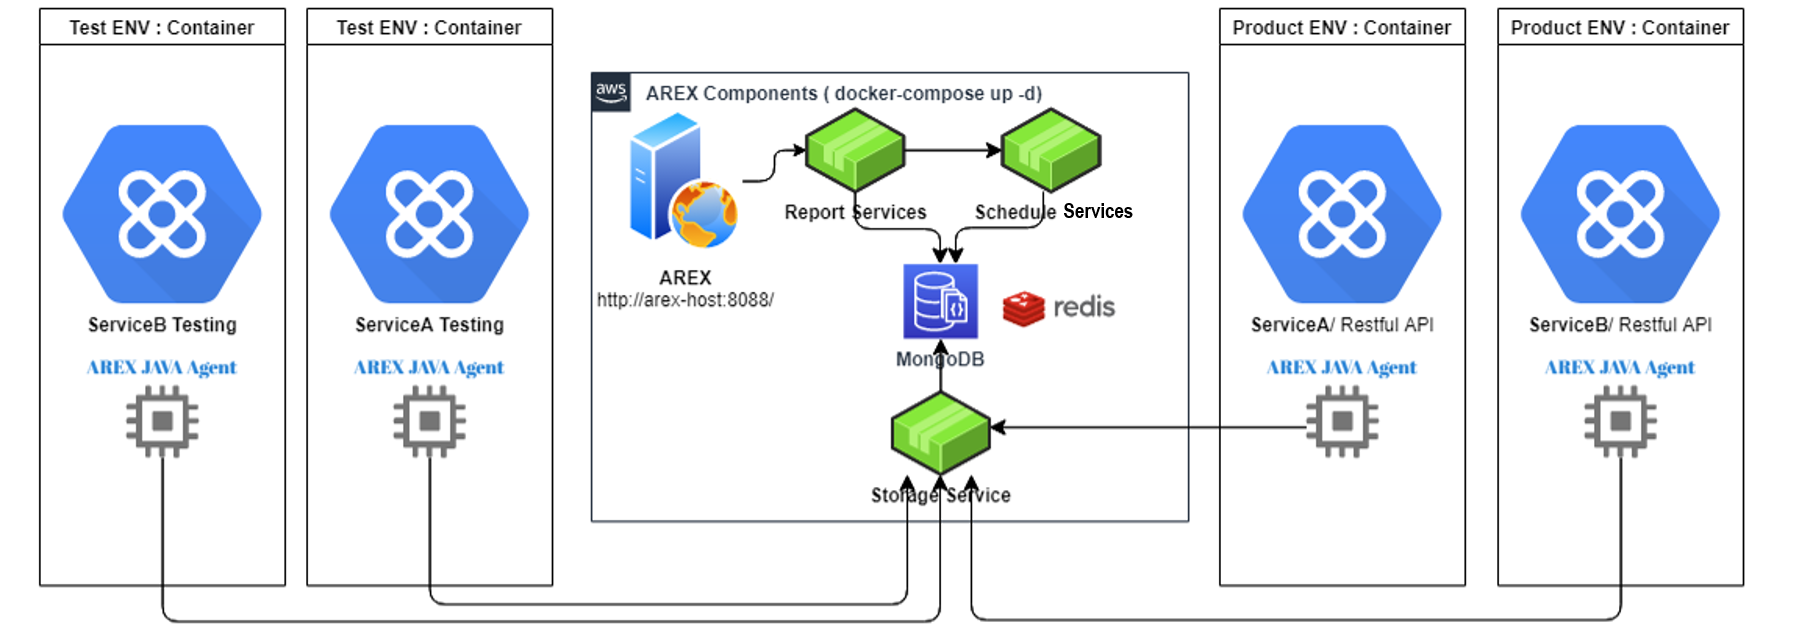
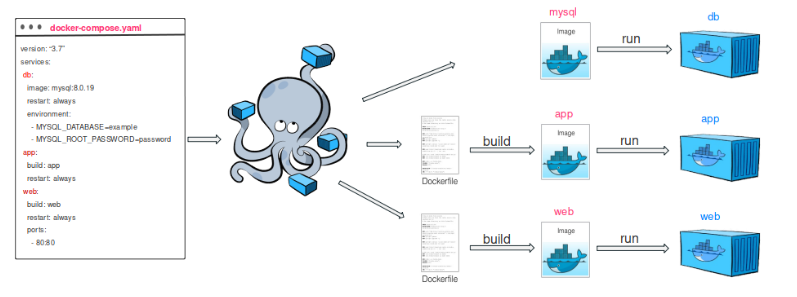
Currently, users can easily install all the basic components of AREX, including the front-end UI, MongoDB database, Redis cache, data storage service (Storage Service), scheduling service (Schedule Service), and analysis service (Report Service), by using the Docker-Compose command with one click (as shown in the figure above). This approach eliminates the need for manual installation and configuration of each service, greatly simplifying the installation process and improving deployment efficiency.(See the details in Docs)
Alternatively, you can also compile and install each service component locally by building Docker images on your machine. This approach is suitable for scenarios that require development and testing of individual services, as it avoids the installation of unnecessary dependencies. It is also suitable for deployment scenarios in offline environments.
This article will provide a detailed guide on how to compile and configure AREX locally. (If you have any other special deployment requirements or suggestions, you can also raise them in a GitHub Issue.)
Building Docker Images Locally
First, create a directory named "github-arex" to store the AREX service components. It is recommended to put all AREX projects in the same directory. The shell scripts in the Deployment repository are accessed by relative paths. If the directory path changes, the relevant configuration in the shell script needs to be updated accordingly.
Download and Compile the AREX Deployment repository.
The Deployment repository includes compilation commands, Dockerfile (used to build images, containing instructions and dependencies required to build images) and Docker-Compose file (used for container orchestration and environment deployment), etc. Switch to the dev branch to compile.
cd github-arex
git clone https://github.com/arextest/deployments.git
cd deployments
git checkout dev # Switch to the dev branch and update the code to the latest version of the dev branch
Download and Compile the AREX UI
AREX UI is an interactive component that is primarily responsible for providing users with an interactive interface to configure and execute tests.
cd github-arex
git clone https://github.com/arextest/arex.git
cd arex-front-end
git pull --rebase
cd ../deployments
./front.build.sh # Execute the front.build.sh script to build the AREX UI component
cat front.build.sh # View the script
cat dockerfile/front.Dockerfile # View the Dockerfile configuration
The front.build.sh script is as follows. When executed, it will copy the Dockerfile and execute the docker build command to build a Docker image based on the Dockerfile. The version number can be modified according to the actual situation.
cd ../arex-front-end

cp ../deployments/dockerfile/front.Dockerfile ./Dockerfile # Copy the file front.Dockerfile and rename it to Dockerfile
docker build -t arexadmin01/arex:0.2.6  .  --build-arg http_proxy=http://ntproxy.qa.nt.ctripcorp.com:8080 --build-arg https_proxy=http://ntproxy.qa.nt.ctripcorp.com:8080 # Build the Docker image named arexadmin01/arex:0.2.6 using the Dockerfile, and specify the http_proxy and https_proxy parameters to speed up the image download through the proxy
rm -rf ./Dockerfile # Delete the Dockerfile after the build

cd ..
Note: If you modify the version number, you also need to synchronize the version number in the Docker-Compose file (docker-compose.yml).
The front.Dockerfile file is shown below, which includes the installation of npm in Nodejs and the exposure of the port (8080).
FROM node:14.18.1 // Use node:14.18.1 as the base image
# Create app directory
WORKDIR /usr/src/app

# Install app dependencies
# A wildcard is used to ensure both package.json AND package-lock.json are copied
# where available (npm@5+)
# COPY package*.json ./
COPY . .

RUN npm install  --loglevel verbose // Install dependencies
RUN npm run build

# Bundle app event
# COPY . .

EXPOSE 8080
CMD [ "node", "server.js",">","./logs/app.log","2>", "./logs/error.log"] // Run server.js using Node.js and output logs to ./logs/app.log and ./logs/error.log.
Note: If you don't need to install with Docker, it can also be compiled and run directly. This method is suitable for scenarios that do not require environment isolation and containerization using Docker. Other service components can also be compiled and run directly in this way.
Download and Compile AREX Storage Service
The AREX Storage Service is mainly responsible for storing the recording data of the Agent, obtaining replay data, and reading the recording and replay configuration.
cd github-arex
git clone https://github.com/arextest/arex-storage.git
git pull --rebase
cd ../deployments
./storage.build.sh # Execute the storage.build.sh script to build the AREX storage component
Download and Compile AREX Schedule Service
The AREX Schedule Service is a scheduling component responsible for coordinating the execution and result comparison of AREX replay tasks. When AREX executes a replay task, the Schedule Service extracts recorded data (requests) of the tested application from the database through the Storage Service and sends interface requests to the target verification service. Once the service receives the request, it processes the request logic, while the Agent loads external dependent data that needs to be MOCKed and returns the response message after processing. The Schedule Service compares the recorded response message with the replay response message and pushes the comparison result to the Analysis Service for subsequent replay report generation.
cd github-arex
git clone https://github.com/arextest/arex-replay-schedule.git
git pull –rebase
cd ../deployments
./schedule.build.sh # Execute the schedle.build.sh script to build the AREX schedule component
Download and Compile AREX Report Service
The AREX Report Service is an analysis component responsible for analyzing recording data, replay results, generating replay reports, and managing test case logic.
cd github-arex
git clone https://github.com/arextest/arex-report.git
git pull -rebase
cd ../deployments
./ report.build.sh # Execute the report.build.sh script to build the AREX report component
Download and Compile AREX Community Test
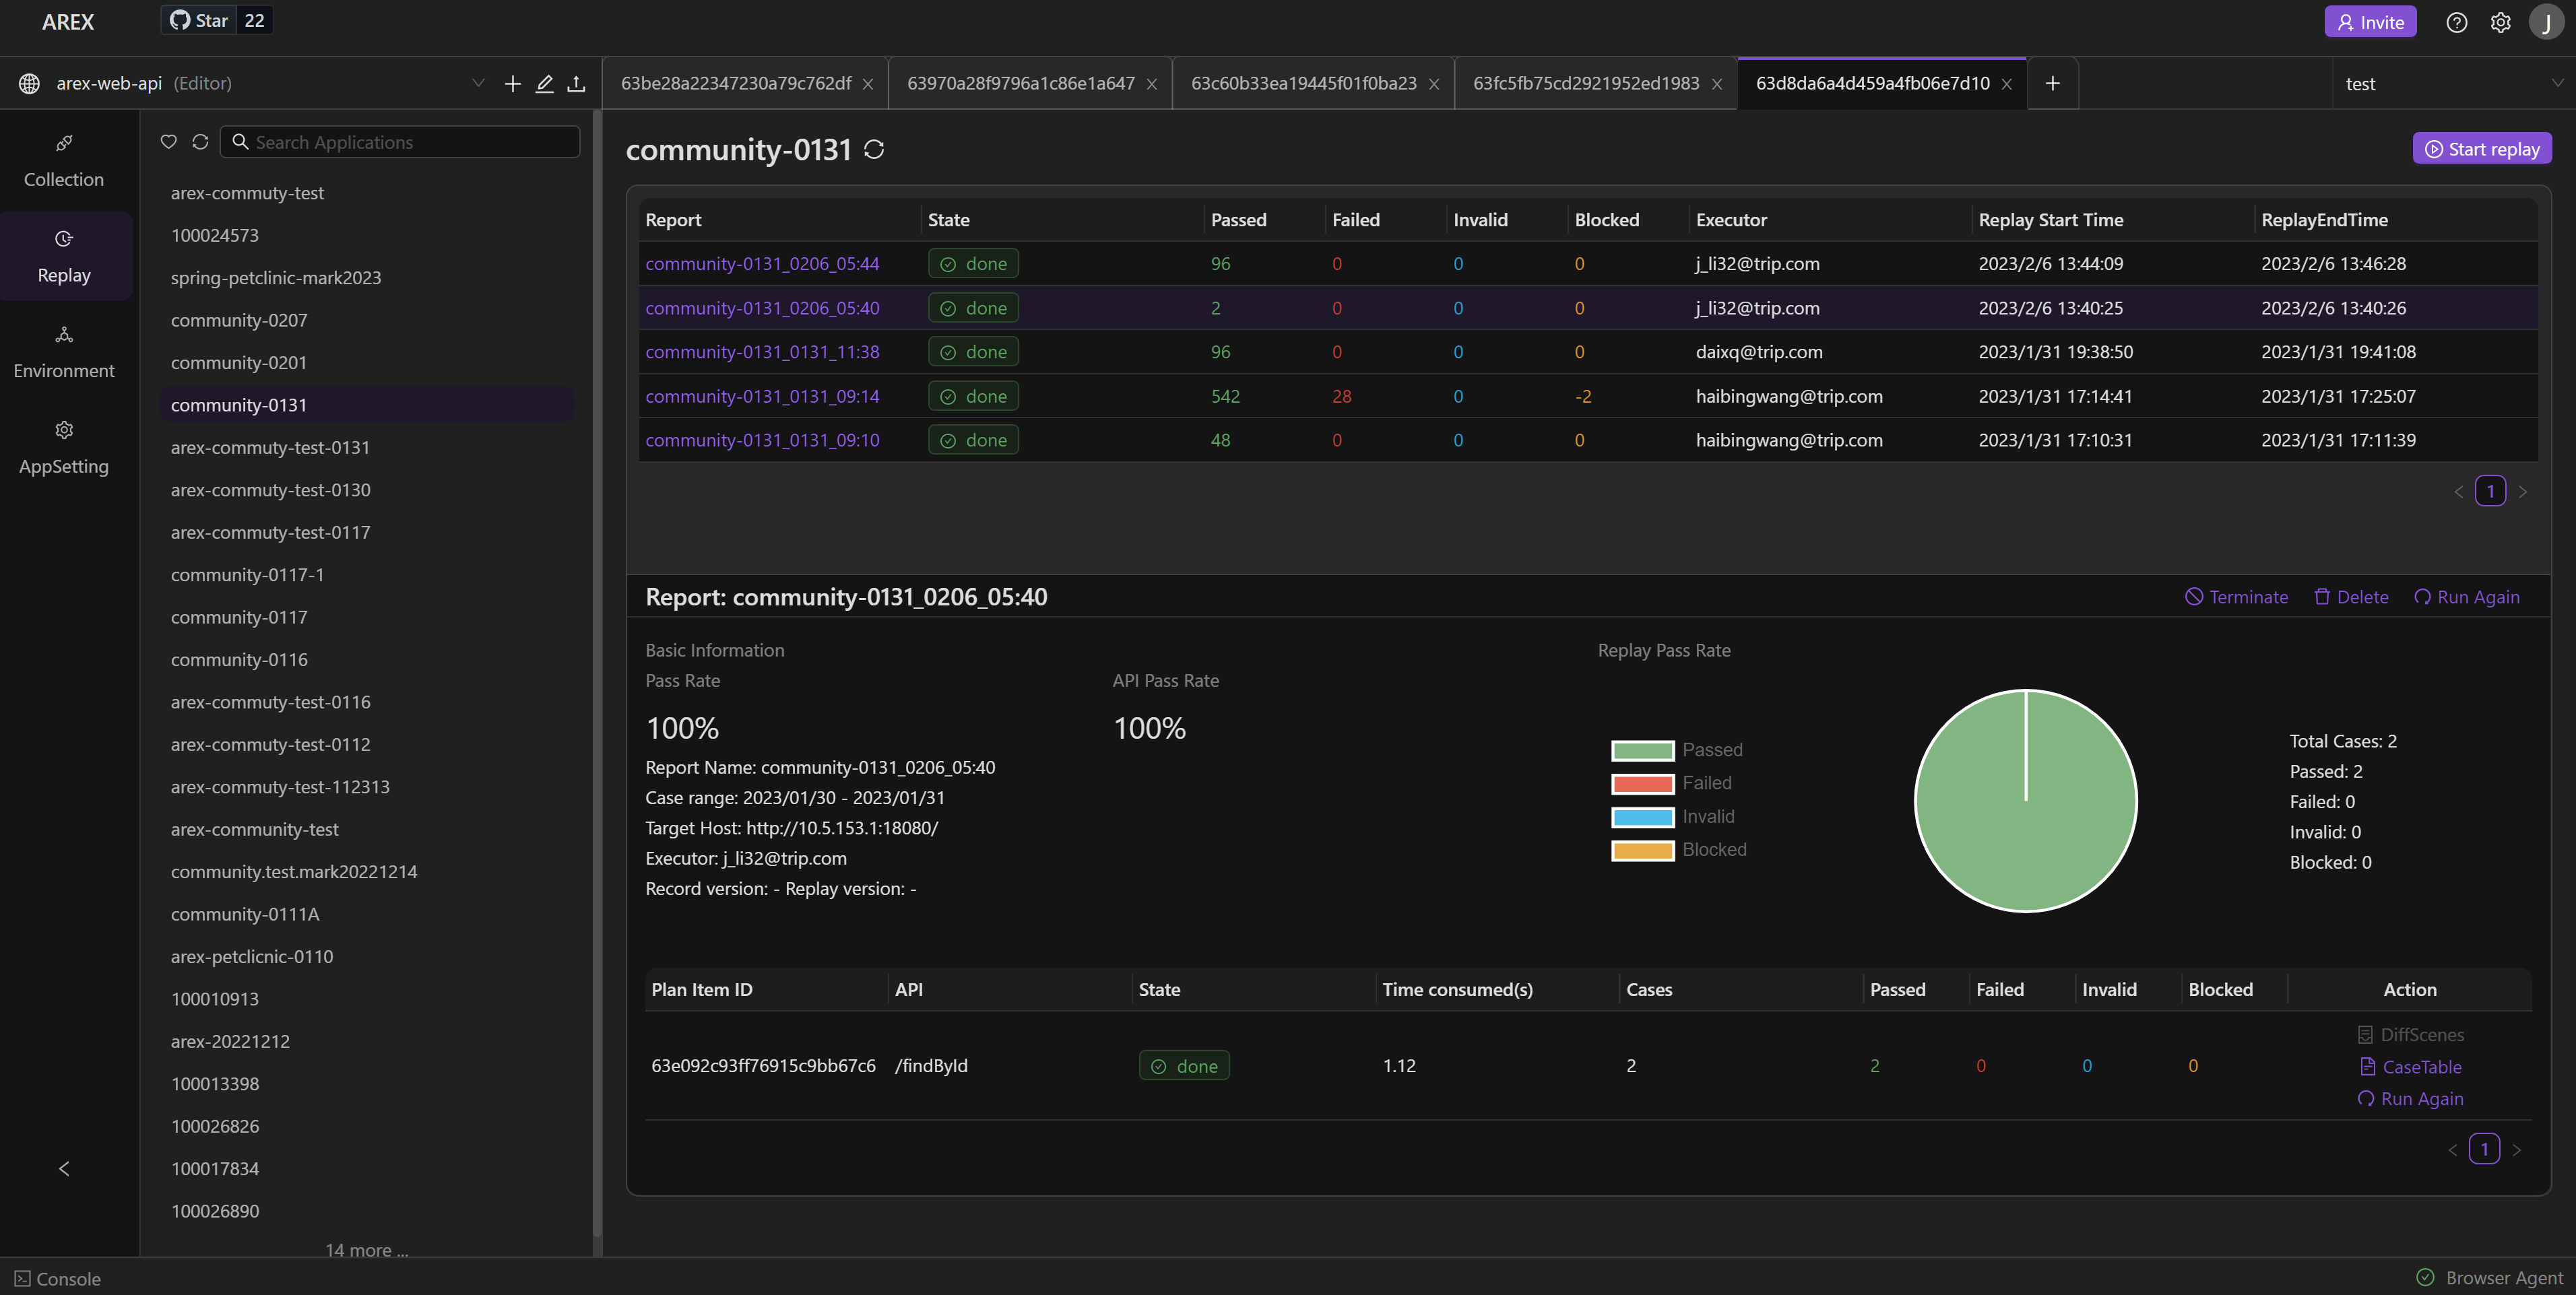
AREX Community Test is a simulated service provided by the AREX community for verifying functionality. You can use it to try out AREX's traffic recording and replay capabilities.
cd github-arex
git clone https://github.com/arextest/arex-commuty-test.git
git pull –rebase
cd ../deployments
./ community.build.sh # Execute the community.build.sh script to build the AREX Community Test component
Download and Compile AREX Java Agent
AREX Java Agent is a recording and replay component responsible for data recording and data mocking during the replay process of Java applications, running in the background of the tested application. During the recording process, the Agent records the data traffic and request information of the Java application and stores this information in the database. During the replay process, the Agent returns the recorded external dependency (external request/DB) responses to the tested application, thereby achieving the effect of mocking.
cd github-arex
git clone https://github.com/arextest/arex-agent-java.git
git pull –rebase
cd ../ arex-agent-java/
mvn clean package # Clean up and package for deployment and running
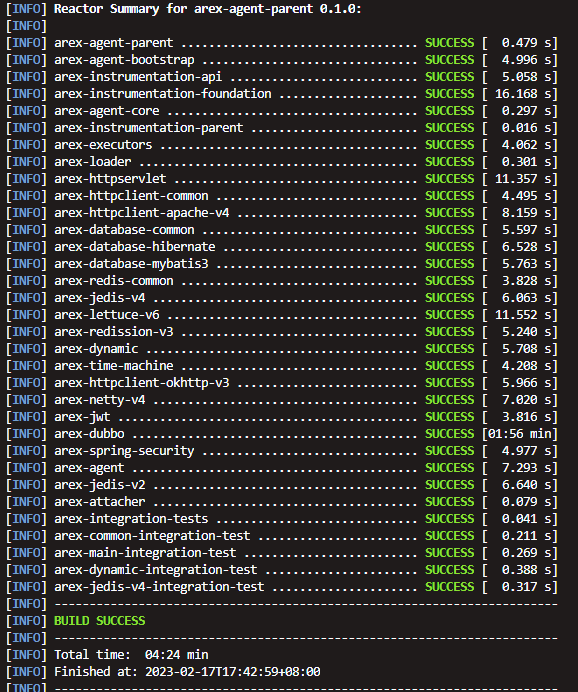
Compilation completed:
To view the latest generated Java Agent file, execute the command ls arex-agent-jar/ as shown in the figure below:

Download and Compile AREX Node Service
Node Service is a script execution service for test cases, responsible for executing pre-test scripts and validation scripts in the Collection module.
cd github-arex
git clone https://github.com/arextest/arex-node-service.git
cd arex-node-service/
git pull --rebase
cd ../deployments
./node.build.sh
As shown in the figure below, all components have been compiled.

If you need to configure a component of the entire AREX system separately, you can modify the configuration items in the Docker-Compose file to achieve it.
The following will provide detailed instructions on how to modify the configuration of various service components, such as modifying database configuration, service port configuration, etc. After completing the modification, the AREX system can run according to your needs.
Configuring Individual Services Separately
Docker Compose is a tool for defining and running multi-container Docker applications. Using Compose, multiple container images can be conveniently coordinated on a single host. In Docker Compose, a configuration file named docker-compose.yml is typically used to configure the services of an application. By modifying the various configuration options in the configuration file, each service in AREX can be run more flexibly. After the configuration is completed, simply run a command to create and start all services from the configuration.
cd github-arex
git clone https://github.com/arextest/deployments.git
cd deployments
cat docker-compose.yml
Configuring the AREX UI Service
For detailed configuration of the AREX UI in the configuration file, please refer to the figure below:
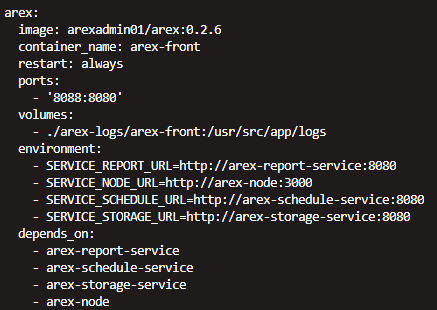
Where:
- The port for the AREX frontend service is 8080, and the port exposed to the outside through the Docker container is 8088. Users can modify it as needed.
- Logs are stored in the arex-logs/arex-front directory under the current directory.
- The AREX UI service depends on four services:
- Analysis service (arex-report-service) for retrieving analysis data.
- Scheduling service (arex-schedule-service) for frontend-triggered replay operations and other calls.
- Storage service (arex-storage-service) for reading configurations and other operations.
- Node service for batch execution of test cases.
Configuring the AREX Node Service
The Node service is a simple service with an internal port of 3000 and an external port of 10001. It generally does not involve external calls and can be ignored.
Configuring the AREX Report Service
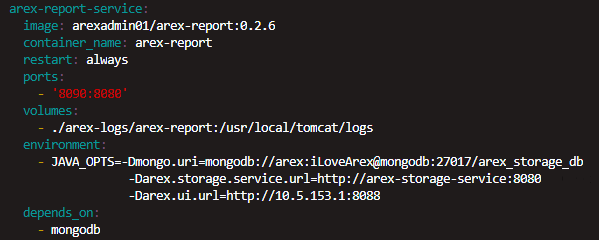
- AREX analysis service depends on the MongoDB database and needs to connect to MongoDB database for data storage and querying. The username and password are the configuration of MongoDB. If the user uses their own MongoDB service, they need to change the connection information to their own MongoDB configuration.
- It depends on the Storage service, and this part does not need to be modified. If it is deployed independently, the address and port need to be modified.
- The internal port of the AREX analysis service is 8080, and the port exposed by Docker container is 8090.
Note: Arex.ui.url is a special configuration item that is used to assemble the login link in the AREX email service. Because AREX's login requires users to enter their email address, and the link sent by the email service needs to point to the accessible AREX frontend address, Arex.ui.url must be configured to the actual frontend address, not the container address in Docker-Compose. If the configuration is incorrect, the link in the email notification will redirect to the wrong page.
Configuring the AREX Storage Service
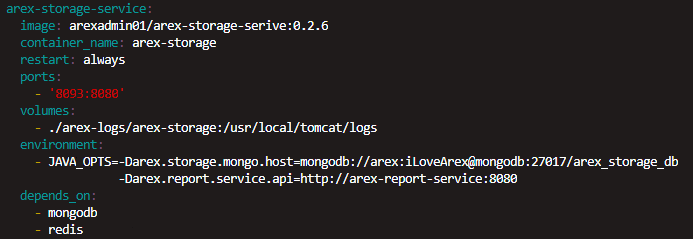
- The internal port of the data storage service is 8080, and the external port is 8093.
- The data storage service depends on:
- MongoDB database, configured as described in the previous section;
- Redis cache, used to store cache in recording and replay to improve performance;
- Report service.
Configuring the AREX Schedule Service
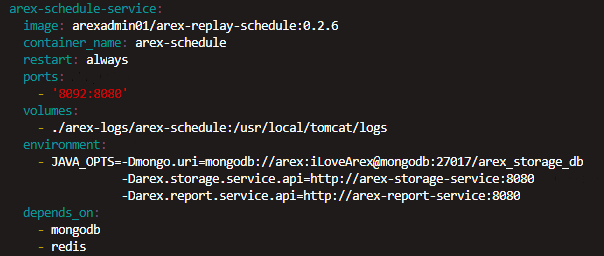
- The internal port of AREX schedule service is 8080, and the port exposed to the outside is 8092.
- The dependencies of AREX schedule service are basically the same as those of the data storage service:
- MongoDB database;
- Redis cache;
- Report service.
Configuring the Redis Service

Redis instance, internal port 6379, exposed port 6379.
If you choose to use a Redis service from another environment, you need to remove the configuration of the Redis service node from the Docker-Compose file and change the relevant configuration in all dependent services to connect to the Redis service which you want.
Configuring MongoDB Service
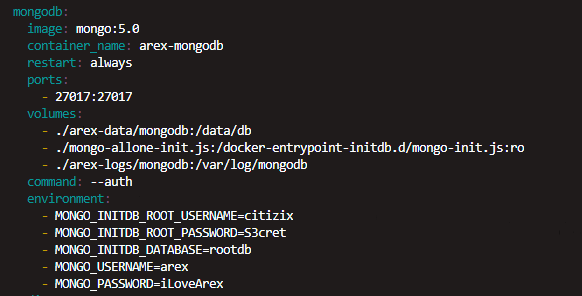
The MongoDB service has internal port 27017 and externally exposed port 27017.
As above, if you choose to use a database from another environment, you need to remove the configuration of the MongoDB service node from the configuration file and change the relevant configuration in all dependent services to connect to the database which you want to work with.
mongo-allone-init.js is a configuration file that depends on the service startup process and is used to initialize some configurations of the MongoDB database. As follows:

The data is stored in the arex-data/mongodb directory in the current directory.
Start AREX with Docker Compose
Once all configurations have been done, start the AREX service:
docker-compose up –d
Stop the AREX service:
docker-compose down –v
View the logs:
docker-compose logs
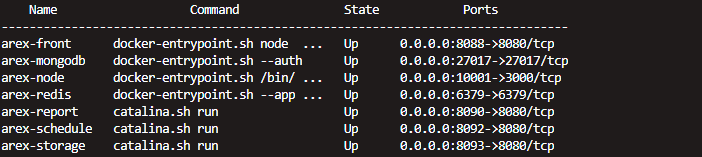
The logs command is used to view the process status of the service. When there is a problem with the State, the logs command can be used for debugging and tracking.