Develope AREX Agent
If you want to contribute to AREX or make custom extensions to Agent to support Mock for certain components, you can refer to this tutorial.
Background
AREX Agent (arex-agent-java) has supported mocking most of the open source components, but for some basic components which are completely self-developed or modified based on open source components are not yet supported, leading to unanticipated differences during replay. For this issue, you can develope plug-ins to AREX Agent. Other scenarios that require expansion or enhancement are similar.
Take the following code as an example, suppose the company has an self-developed database access layer component: DalClient.
Object result = dalClient.query(key)
if (result != null) {
    return result; // Database has values while recording
} else {
    return rpc.search(); // No value during replay then call the remote interface
}
While it is possible to use the dynamic class method Mock in this scenario, dynamic class support is less comprehensive and requires configuration costs.
Mocking the DalClient component with plugin can make you to customise the recording and replay logic in a more flexible way, suitable for complex scenarios.
Let's take the DalClient component as an example and explain in detail how to develop a corresponding plugin to record and replay.
Setup Environment
- Download AREX Agent codes locally and run
mvn clean install -DskipTests.
git clone https://github.com/arextest/arex-agent-java.git
mvn clean install -DskipTests //This step installs the arex-agent-java dependencies into your local maven repository, which may be required by our plugin project.
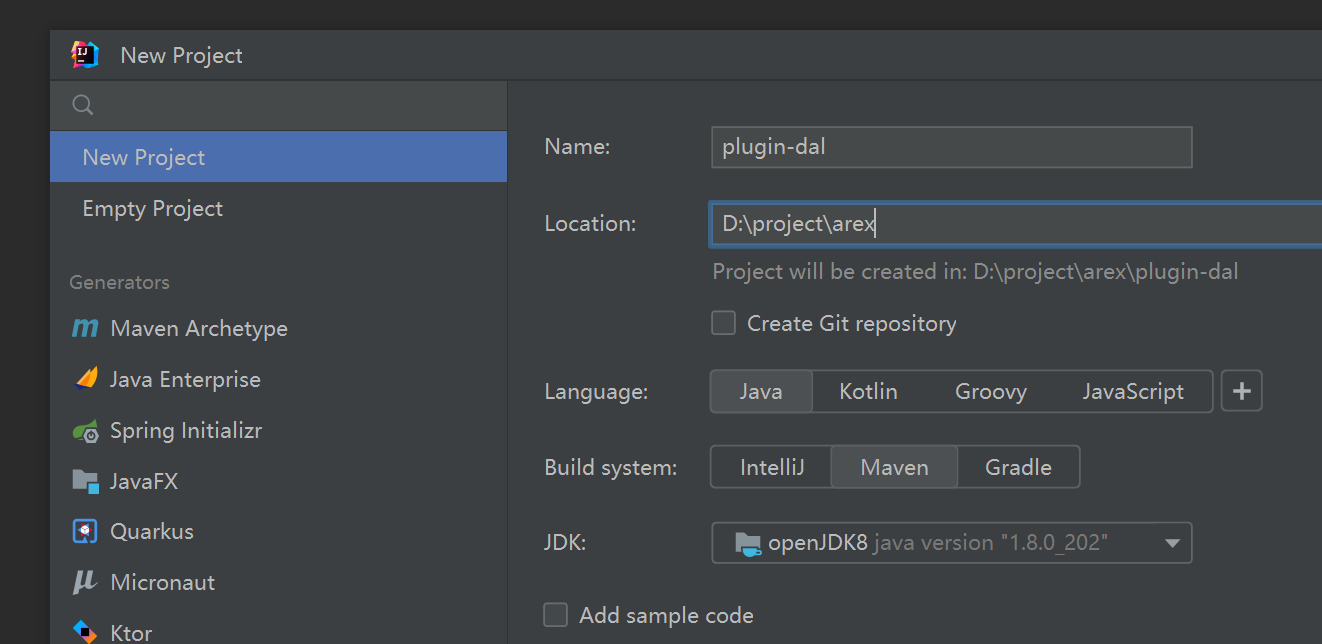
- Create a normal java project, here choose new project from IntelliJ IDEA:
Once created, add the AREX Agent dependencies to the pom file:
<dependencies>
    <!-- arex-agent Some basic classes and tools used, such as recording and repaly related components, configuration information, etc. -->
    <dependency>
        <groupId>io.arex</groupId>
        <artifactId>arex-instrumentation-api</artifactId>
        <version>${arex.version}</version>
    </dependency>
    <!-- arex-agent Serialization Related Components -->
    <dependency>
        <groupId>io.arex</groupId>
        <artifactId>arex-serializer</artifactId>
        <version>${arex.version}</version>
    </dependency>
    <!-- This is only for demonstration, In actual development, just replace it with the components you need for Mock. -->
    <dependency>
        <groupId>com.your.company.dal</groupId>
        <artifactId>dalclient</artifactId>
        <version>1.0.0</version>
        <scope>provided</scope>
    </dependency>
</dependencies>
If the plugin needs to use other features of arex-agent-java, you can also add your own dependencies as appropriate (remember to perform the first step first).
Develope
Step 1: Creat DalClientModuleInstrumentation Entry Class
Once the project is set up, we can develope. arex-agent-java loads and instantiates plugins as SPI, so we declare a DalClientModuleInstrumentation class based on the com.google.auto.service.AutoService annotation, which is the entry point for the implementation of the DalClient component and is recognized by arex-agent-java (@AutoService).
@AutoService(ModuleInstrumentation.class)
public class DalClientModuleInstrumentation extends ModuleInstrumentation {
    public DalClientModuleInstrumentation() {
       // Plugin module name, you can specify a different version match if the code difference between different versions of your DalClient component is relatively large and to be supported in separate versions:
       // ModuleDescription.builder().name("dalclient").supportFrom(ComparableVersion.of("1.0")).supportTo(ComparableVersion.of("2.0")).build();
       super("plugin-dal");
    }

    @Override
    public List<TypeInstrumentation> instrumentationTypes() {
          // The class where we actually go to tinker with the DalClient bytecode
      return singletonList(new DalClientInstrumentation());
    }
}
So when is it necessary to distinguish between version numbers?
If the DalClient component has the invoke() method in the source code of version 1.0.0, but the name is changed to invokeAll() in the code of version 2.0.0, that means there is a difference in the version of the DalClient component between version 1.0.0 and version 2.0.0, in this case, the code modified by the Agent Plug-in will not be able to cover both versions of the DalClient framework, in this case, it may need to be adapted for the different versions.
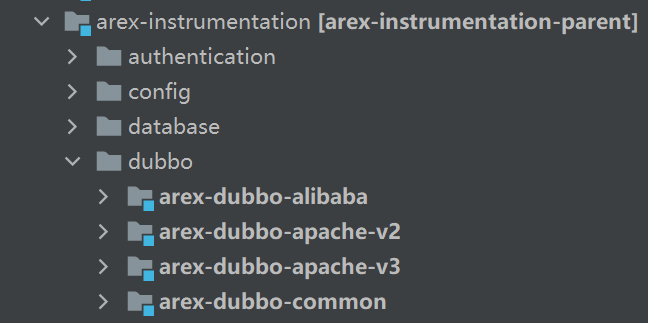
The implementation can refer to the logic for adapting to different Dubbo versions in the arex-dubbo-apache-v2/DubboModuleInstrumentation.java and arex-dubbo-apache-v3/DubboModuleInstrumentation.java of arex-instrumentation/dubbo/ module in the arex-agent-java project.
Of course if the source code of the framework you're modifying is the same in different versions, there's no need to differentiate.
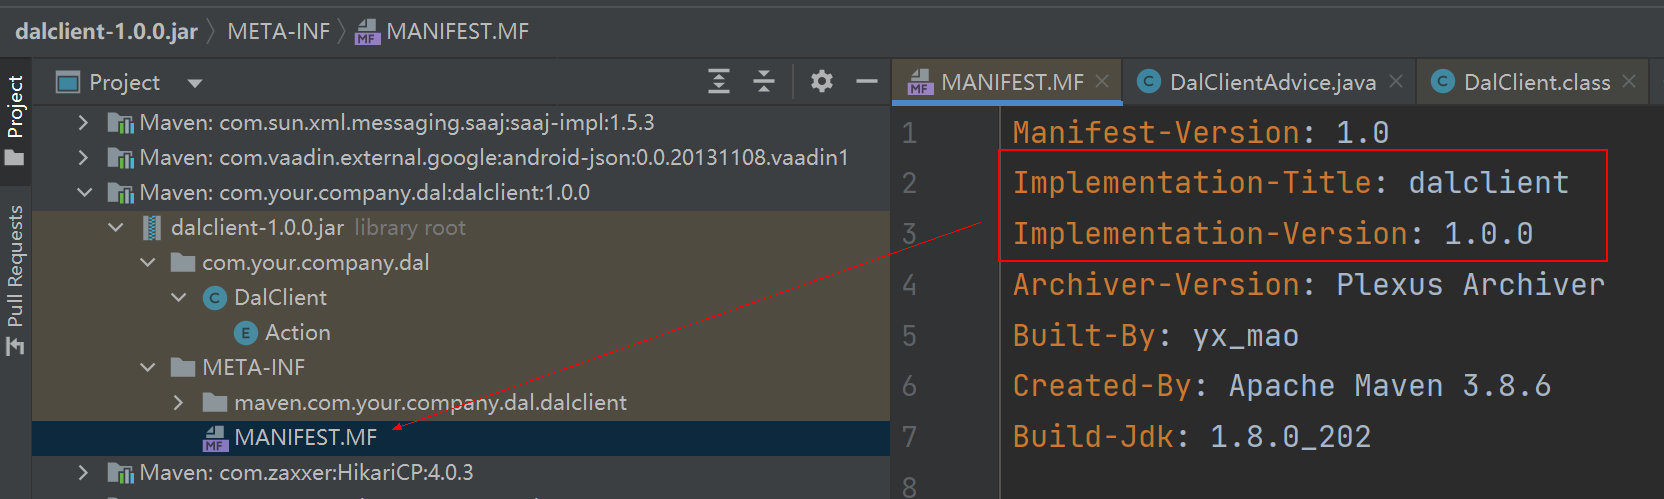
Matching version number is implemented based on the contents of the META-INF/MANIFEST.MF file in the jar package of the component you want to mock:
Step 2: Implement the bytecode modification
The following new DalClientInstrumentation.java file implements the specific bytecode modification logic.
The principle of modifying DalClient's source code is simple: find its underlying implementation, preferably a generic API, and then use a bytecode tool such as bytebuddy to modify this API, add our own code, and implement the Mock functionality.
Here is the DalClient source code that we are going to modify (Demo):
package com.your.company.dal;

public class DalClient {
    public Object query(String param) {
        return this.invoke(DalClient.Action.QUERY, param);
    }

    public Object insert(String param) {
        return this.invoke(DalClient.Action.INSERT, param);
    }

    private Object invoke(Action action, String param) {
      Object result;
        switch (action) {
            case QUERY:
                result = "query:" + param;
            case INSERT:
                result = "insert:" + param;
            case UPDATE:
                result = "update:" + param;
            default:
                result = "unknown action:" + param;
        }
        return result;
    }

    public static enum Action {
        QUERY,
        INSERT,
        UPDATE;
        private Action() {
        }
    }
}
The usual business project is to call dalClient.query(key), through the source code above you can see that the underlying implementation is to call invoke.
So it is possible to add recording and playback code by modifying the invoke method, i.e. the DalClientInstrumentation class functions as follows:
public class DalClientInstrumentation extends TypeInstrumentation {
    @Override
    public ElementMatcher<TypeDescription> typeMatcher() {
               // 我们要修改的 DalClient 类路径
               return named("com.your.company.dal.DalClient");
    }

    @Override
    public List<MethodInstrumentation> methodAdvices() {
        ElementMatcher<MethodDescription> matcher = named("invoke") // The method we want to modify
                .and(takesArgument(0, named("com.your.company.dal.DalClient$Action"))) // The type of the first parameter of this method, which may have a method of the same name, is easy to distinguish.
                .and(takesArgument(1, named("java.lang.String")));
                       // The InvokeAdvice class is the code we need to add to the invoke method.
                       return singletonList(new MethodInstrumentation(matcher, InvokeAdvice.class.getName()));
    }
}
Note that MethodInstrumentation, ElementMatcher, named, takesArgument and other methods in the above code are ByteBuddy's APIs, and AREX Agent uses ByteBuddy (https://bytebuddy) to modify bytecode for recording and playback by default. .net/) to modify byte code for recording and playback, please refer to the official documentation for details: https://bytebuddy.net/#/tutorial.
Step 3: Realize recording and replay
Here is the code to add to the DalClient#invoke method, implementing InvokeAdvice:
public static class InvokeAdvice {
    // OnMethodEnter Indicates the action performed before the modified method (invoke) logic is invoked.
    @Advice.OnMethodEnter(skipOn = Advice.OnNonDefaultValue.class, suppress = Throwable.class)
    public static boolean onEnter(@Advice.Argument(0) DalClient.Action action, // Get a reference to the first parameter of the modified method
                                  @Advice.Argument(1) String param, // Get a reference to the second parameter of the modified method
                                  @Advice.Local("mockResult") MockResult mockResult) { // Our customized variable mockResult within this method
        mockResult = DalClientAdvice.replay(action, param); // Replay
        return mockResult != null && mockResult.notIgnoreMockResult();
    }

    // OnMethodExit indicates the action performed before the modified method (invoke) ends.
    @Advice.OnMethodExit(suppress = Throwable.class)
    public static void onExit(@Advice.Argument(0) DalClient.Action action,
                              @Advice.Argument(1) String param,
                              @Advice.Local("mockResult") MockResult mockResult,
                              @Advice.Return(readOnly = false) Object result) {
        // The result of the method result
        if (mockResult != null && mockResult.notIgnoreMockResult()) {
            result = mockResult.getResult(); // Use the result of replay
            return;
        }
        DalClientAdvice.record(action, param, result); // Recording logic
    }
}
The function of this class is to add code before and after a modified invoke method call to enable recording and replay.
Among them:
The skipOn = Advice.OnNonDefaultValue parameter indicates that if mockResult ! = null && mockResult.notIgnoreMockResult() is true (not the default value, boolean type defaults to false) then skip the original logic of the method, i.e., return the value of our Mock without executing the original method logic. If false, then the method's original logic is executed.
The modified bytecode is shown below:
public class DalClientInstrumentation extends TypeInstrumentation {
    private Object invoke(DalClient.Action action, String param) {
               // Replay
               MockResult mockResult = DalClientAdvice.replay(action, param);
        if (mockResult != null && mockResult.notIgnoreMockResult()) {
            return mockResult.getResult();
        }

        // Original logic
        Object result;
        switch (action) {
            case QUERY:
                result = "query:" + param;
            case INSERT:
                result = "insert:" + param;
            case UPDATE:
                result = "update:" + param;
            default:
                result = "unknown action:" + param;
        }

        DalClientAdvice.record(action, param, result); // Record

        return result;
    }
}
Similar to the AOP function, insert our code before and after the call respectively, if the replay is successful then return the result of the Mock, do not go to the original logic, if not playback, that is, need to record, then record the result before return.
The code of DalClientAdvice class is as follows (for reference only):
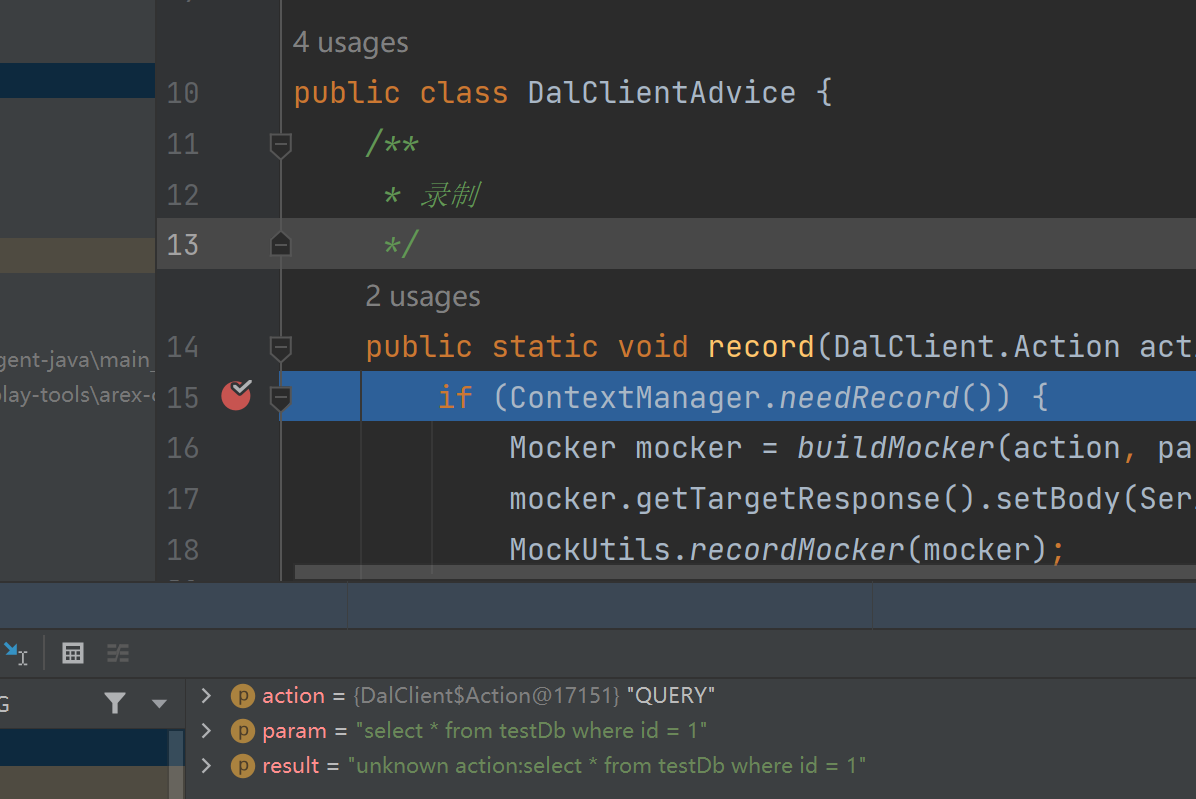
public class DalClientAdvice {
    // Record
    public static void record(DalClient.Action action, String param, Object result) {
        if (ContextManager.needRecord()) {
            Mocker mocker = buildMocker(action, param);
            mocker.getTargetResponse().setBody(Serializer.serialize(result));
            MockUtils.recordMocker(mocker);
        }
    }

    // Replay
    public static MockResult replay(DalClient.Action action, String param) {
        if (ContextManager.needReplay()) {
            Mocker mocker = buildMocker(action, param);
            Object result = MockUtils.replayBody(mocker);
            return MockResult.success(result); DalClientInstrumentation          }
        return null;
    }

    private static Mocker buildMocker(DalClient.Action action, String param) {
        Mocker mocker = MockUtils.createDatabase(action.name().toLowerCase());
        mocker.getTargetRequest().setBody(param);
        return mocker;
    }
}
The above is just a simple demo, you can also implement your own logic, you can refer to the arex-instrumentation module of the arex-agent-java project for specific usage, which is full of implementations that modify various middleware.
Deploy
After development you can test your plugin to see if it works properly, the steps are as follows:
- Run
mvn clean compile packageto generate the plug-in jar package (by default, it is located in the /target directory of the project); - Run
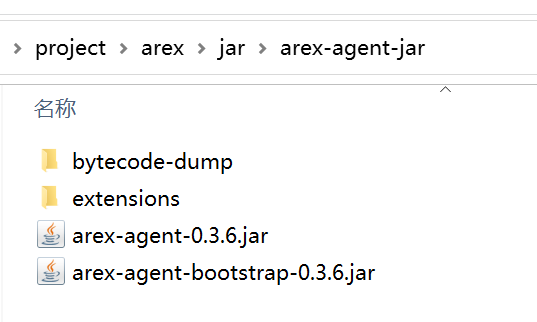
mvn clean compile packagecommand in thearex-agent-javaproject to generate thearex-agent-jardirectory (located in the project root directory); - Create a new
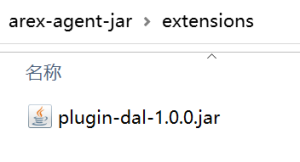
extensionsfolder in thearex-agent-jardirectory to store the extension jar packages; - Place the generated plugin jar (e.g.,
plugin-dal-1.0.0.jar) in theextensionsfolder you created earlier.
The AREX Agent loads all the jars in the extensions folder as extensions at startup, with the following directory structure:
Next you can debug our plugin functionality, start your business application and note that you have to mount the Agent in the VM option first:
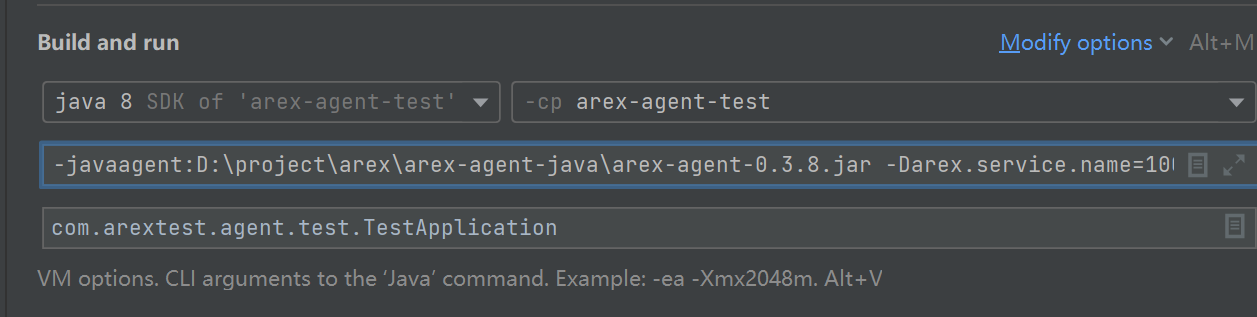
The detailed parameters are as follows:
-javaagent:your own local project's \arex-agent-java\arex-agent-0.3.8.jar
-Darex.service.name=Service name that you can distinguish.
-Darex.storage.service.host=arex storage service ip:port
-Darex.enable.debug=true
This allows Agent to load the plugin package after starting the project.
If the business project references an internal DalClient component, the name of the plugin declared in DalClientModuleInstrumentation will be visible in the console after starting the project:
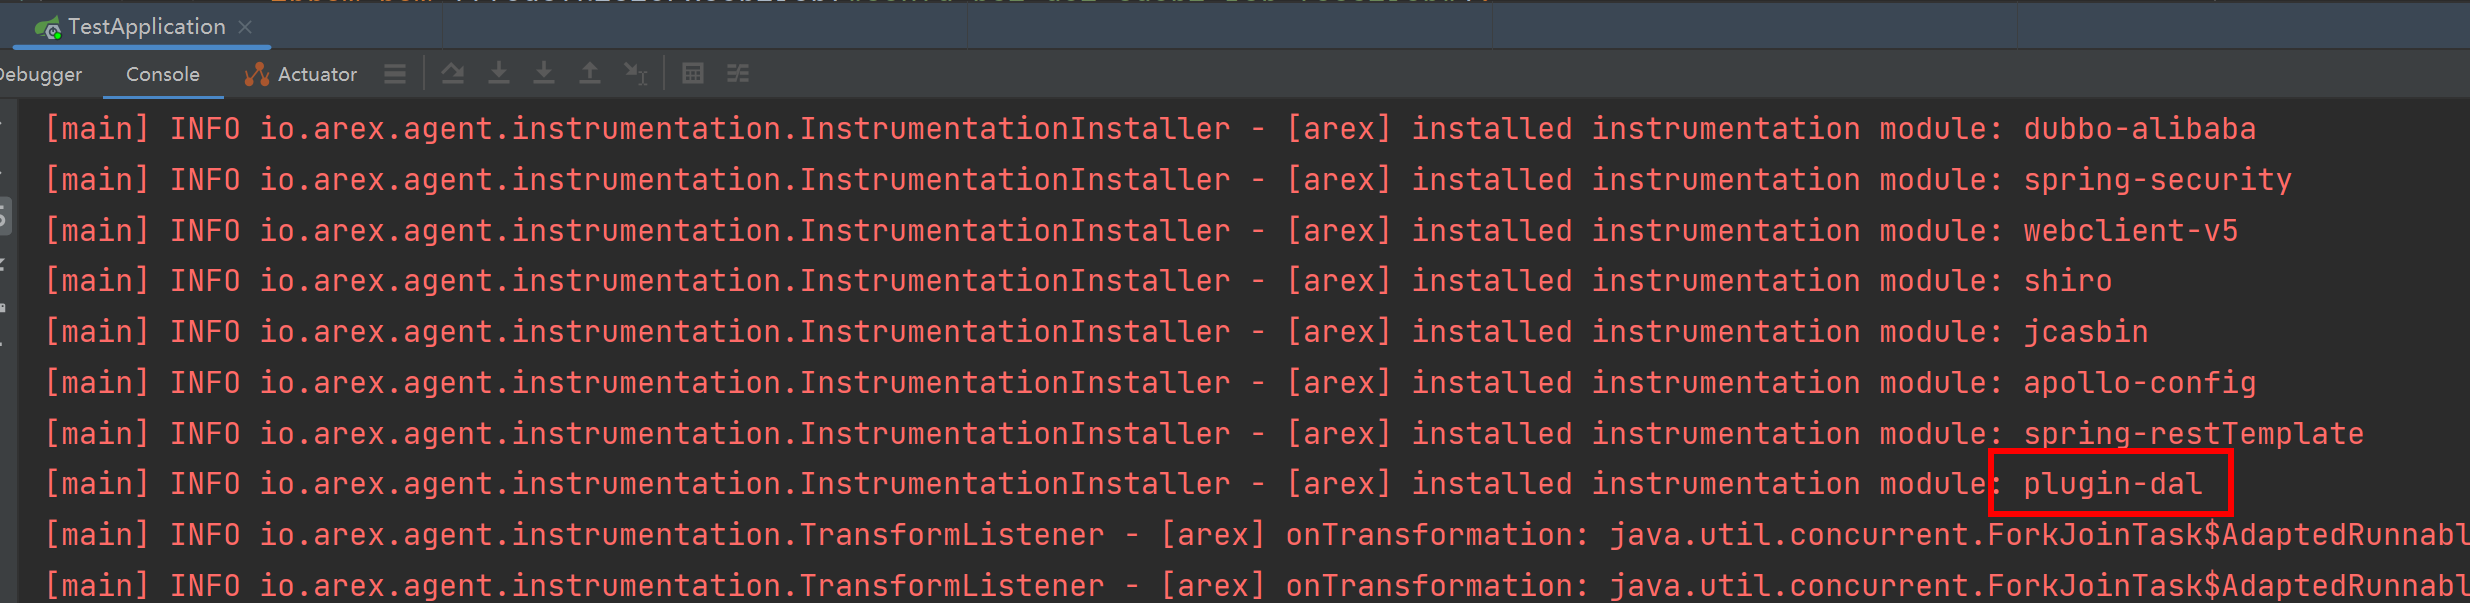
If the console outputs the [arex] installed instrumentation module: plugin-dal log, the plugin has been recognized and loaded.
Next, test whether the plugin works properly. As you can see below, an interface in the business project calls the query method of the DalClient component, so you can call this interface and see if the plugin can record or replay the invoke method of the DalClient component (the query internally calls invoke), and if it can record successfully it prints the following logs If the recording is successful, the following log will be printed:
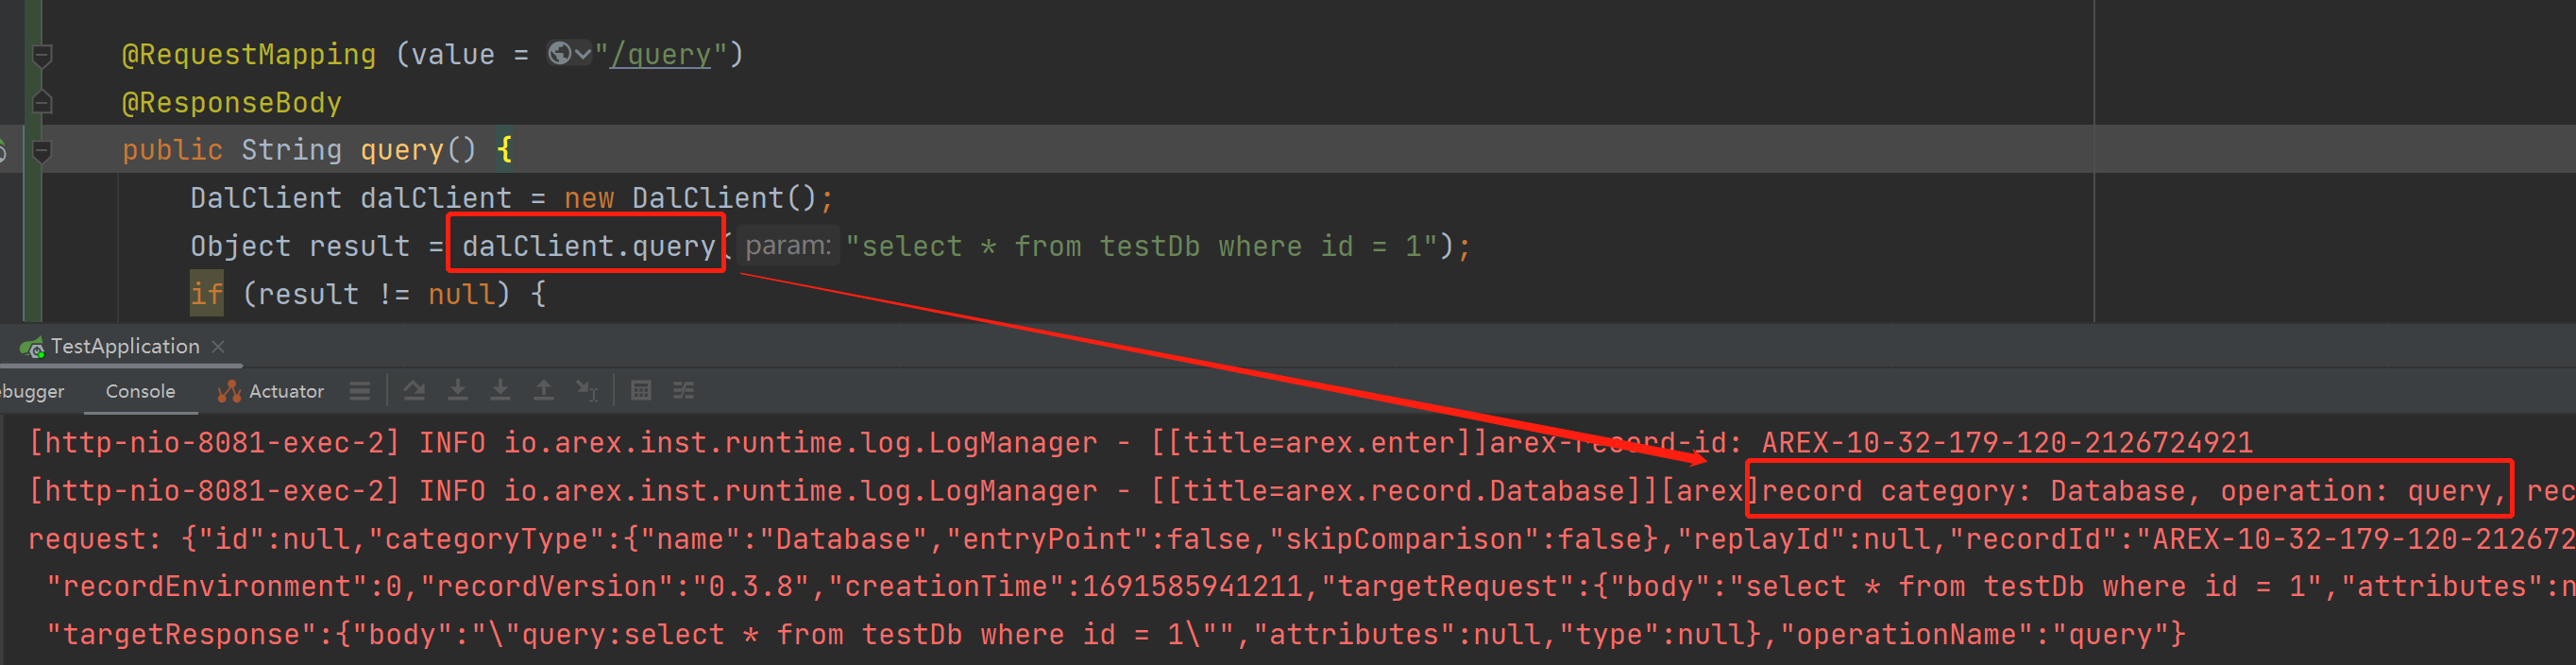
Similarly, if you test the replay functionality with arex-record-id:AREX-10-32-179-120-2126724921 in the request header (the recordId that was generated during the recording in the figure), a successful replay will also output the [arex]replay category: Database, operation: query related logs in the console. operation: query` related log.
Debug
If you say that the plugin functionality is not working properly or matching the expected behavior, you can troubleshoot the following two points:
- Look at the bytecode in the
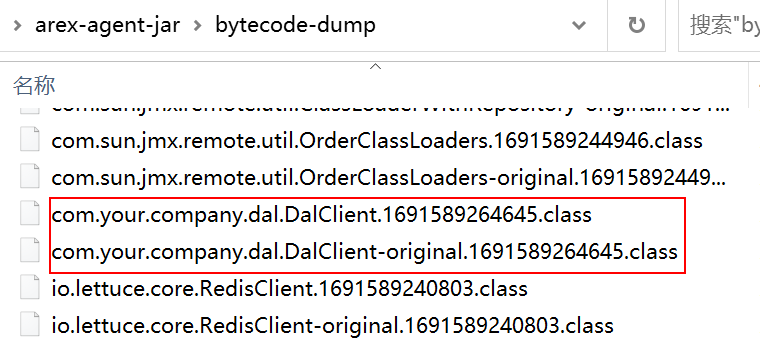
arex-agent-jar/bytecode-dumpfolder (refer to the screenshot in the Deploy section)
The bytecode-dump holds our modified bytecode file, where you can find the pre-modified and post-modified class files: bytecode-dump, bytecode-dump and bytecode-dump.
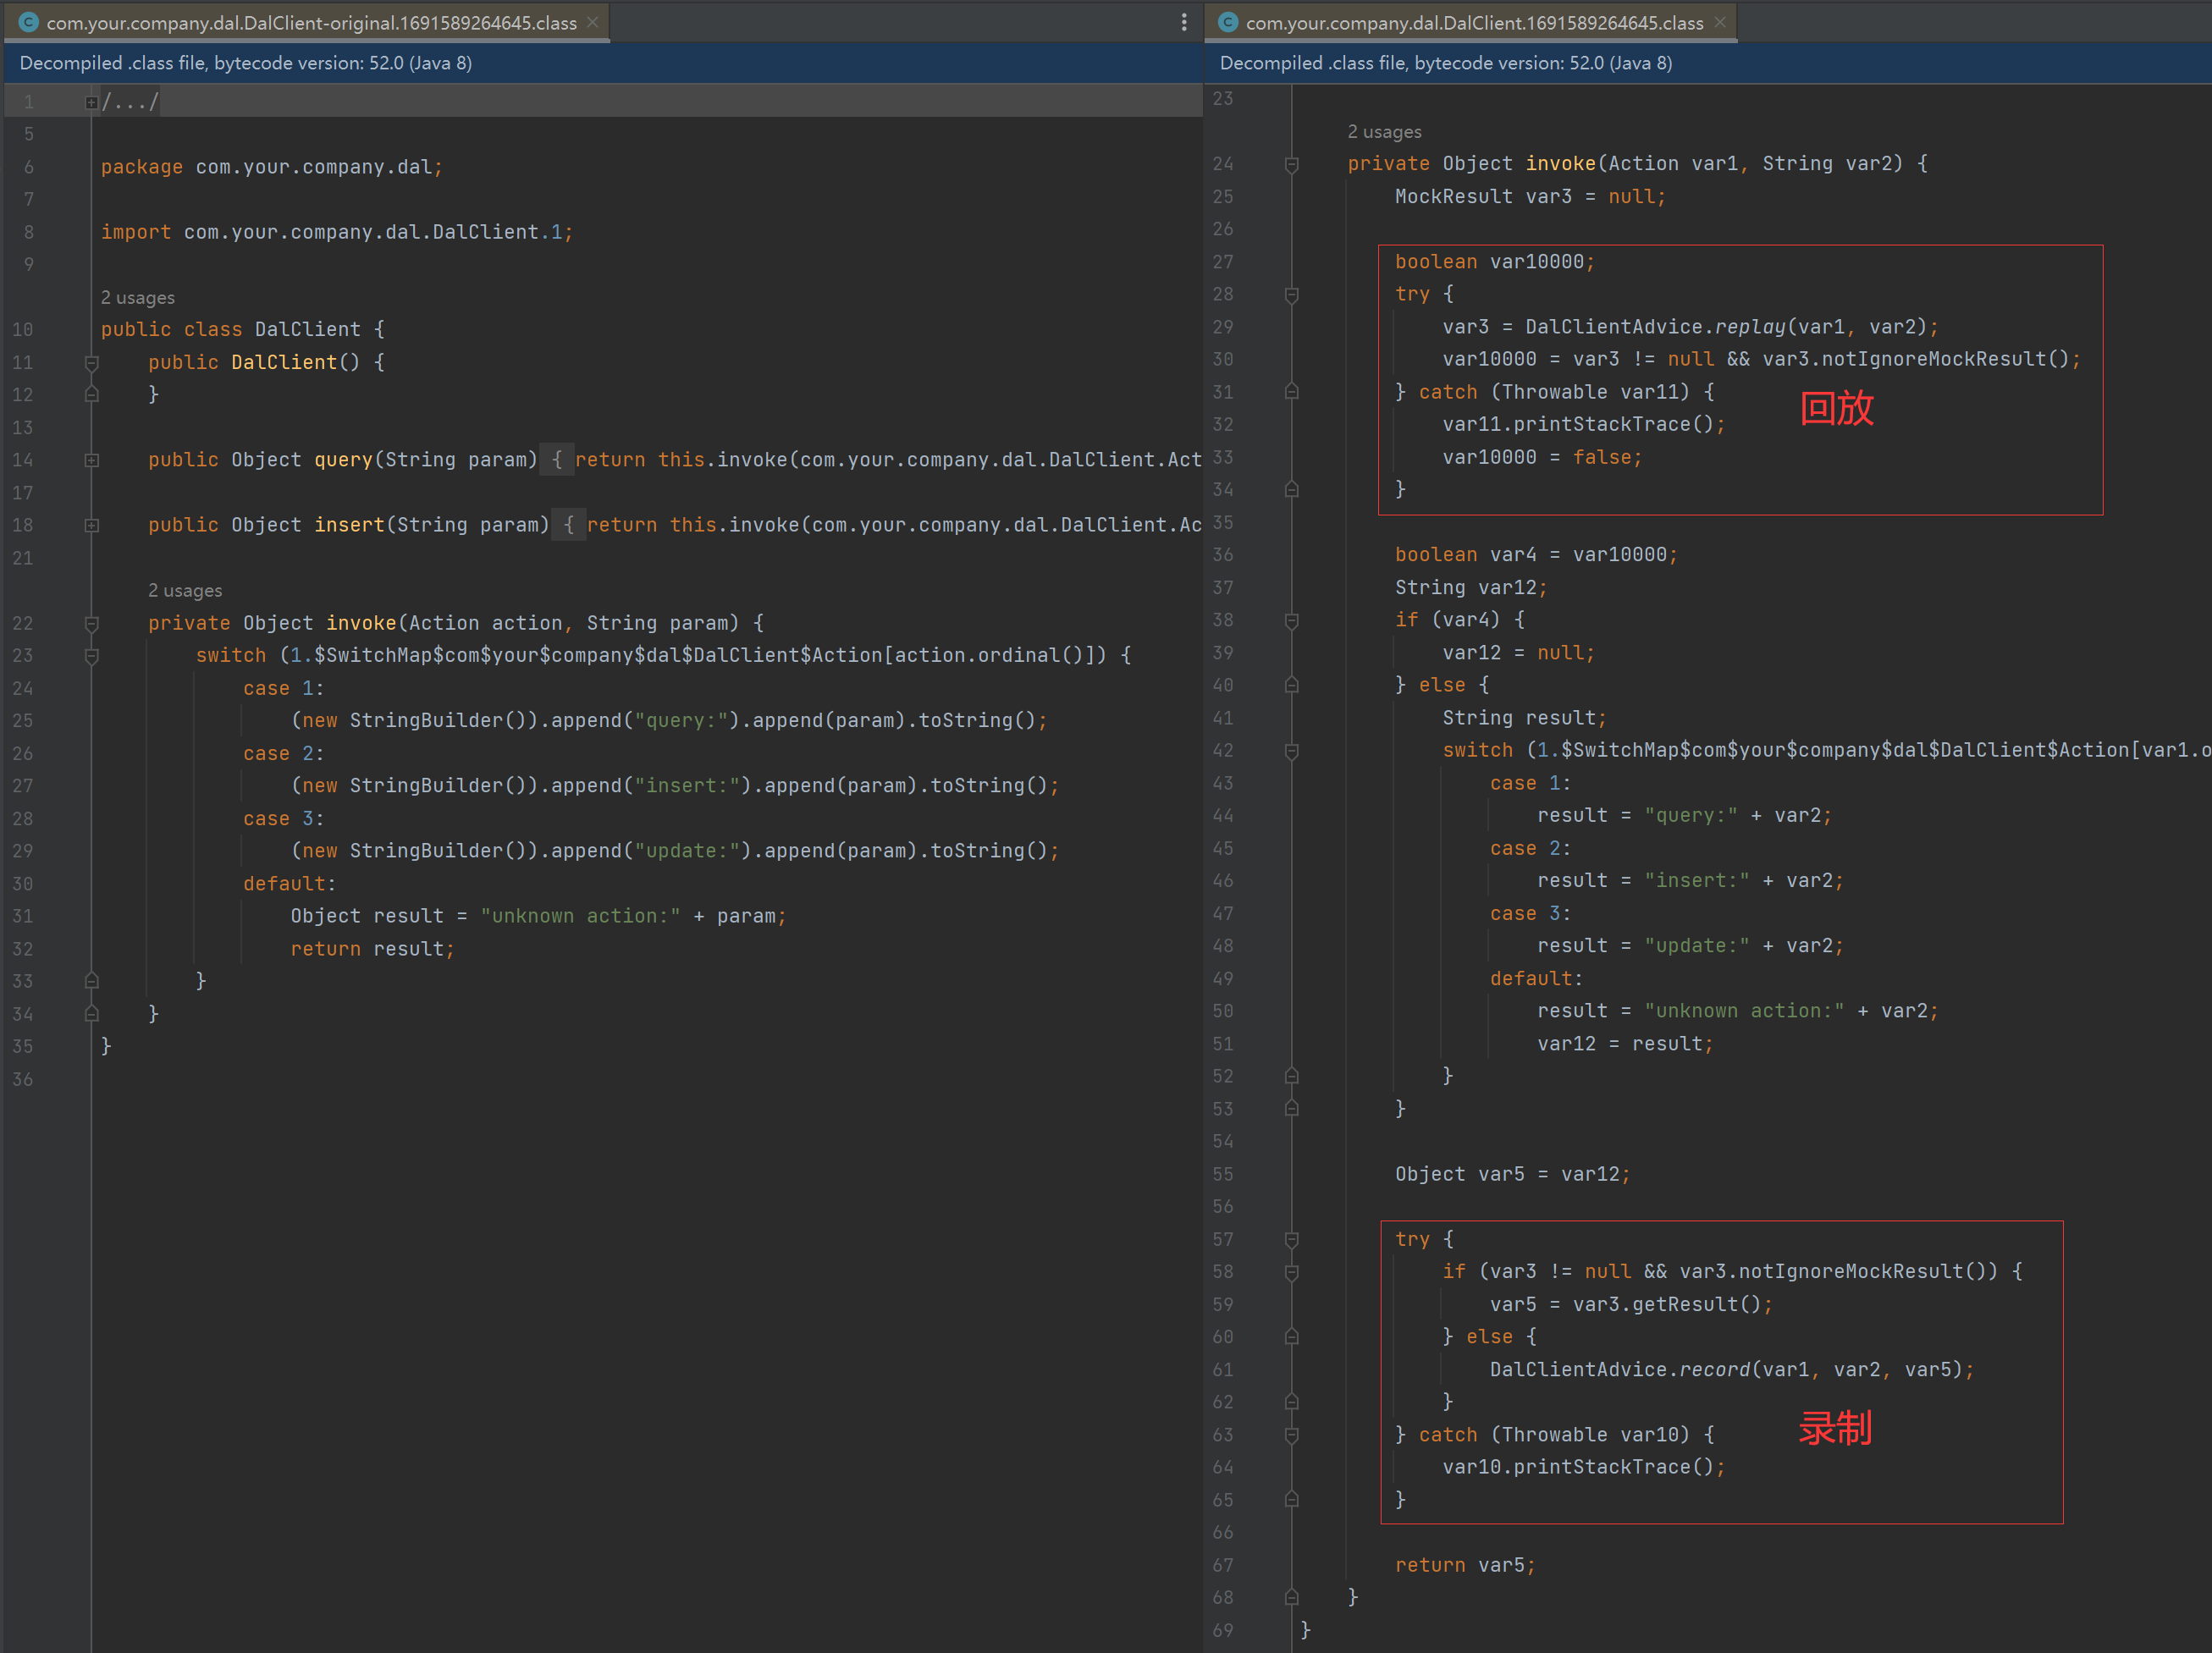
Drag the above two files to the IDE (automatic decompilation), to confirm whether the modification is successful, as shown in the following comparison chart (the left is the original code logic, the right is the plug-in modified code):
If the modification is not successful, you can refer to the source code of the project Demo: https://github.com/arextest/arex-agent-java-extension-demo or https://gitee.com/arextest/arex-agent-java-extension-demo/
If the modification code succeeds but the code does not match the expected behavior, you can debug the source code of the plugin with debug in the IDE with the following steps:
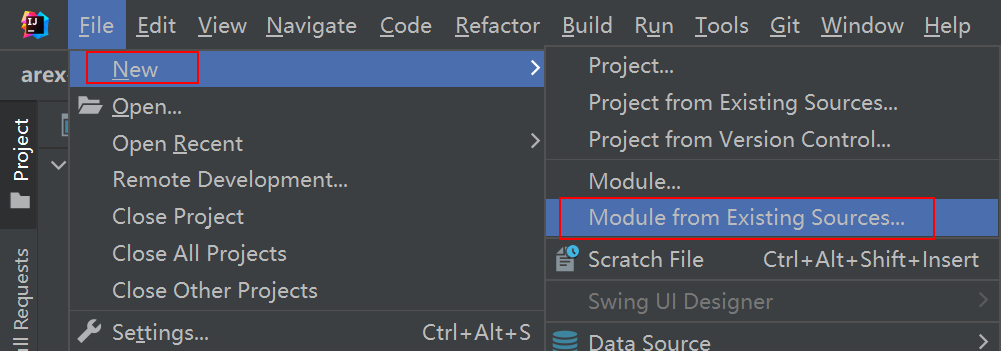
- Import the
arex-agent-javaproject into the IDE where the business project is located: File → New → Module from Existing Sources...
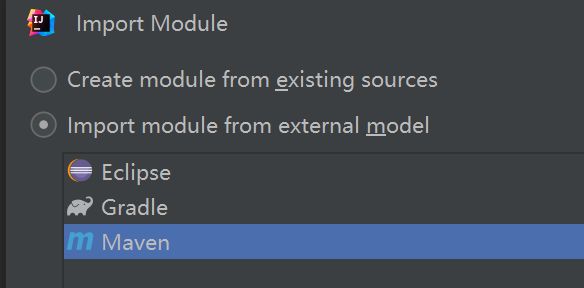
Select your local arex-agent-java project and then select Maven.
- Import the plug-in project into the IDE of the business project as well, as above.
After successful import, there are arex-agent-java and plugin-dal project source code in addition to the original business project:

This allows you to break points in both projects to debug the Agent and plugin code, as shown below:
Summary
Above is how to develop Agent plugin to support component Mock, Simply put, it is to record the return results, and then replay according to the request parameters to match the recorded results for playback.
To summarize, there are three steps:
create a new
DalClientModuleInstrumentationentry class,arex-agent-javawill be loaded at startup;create a new
DalClientInstrumentationclass that tells AREX Agent which class to modify, which method to modify, and when to execute it;create a new
DalClientAdviceclass to implement the actual recording and replay, or your own logic.
I hope this document can help you developers to carry out secondary development, the development process encountered problems are always welcome to communicate with us feedback (QQ group: 656108079).