
This post shares how to quickly set up AREX service in AWS environment, and use AWS DocumentDB as the database to replace the official default MongoDB, and use ElastiCache to replace the default Redis.
Install AREX
You need to sign up for an AWS account and know about the concepts before you can use it, please refer to AWS Documentation.
Step 1: Prepare an EC2 for AREX deployment
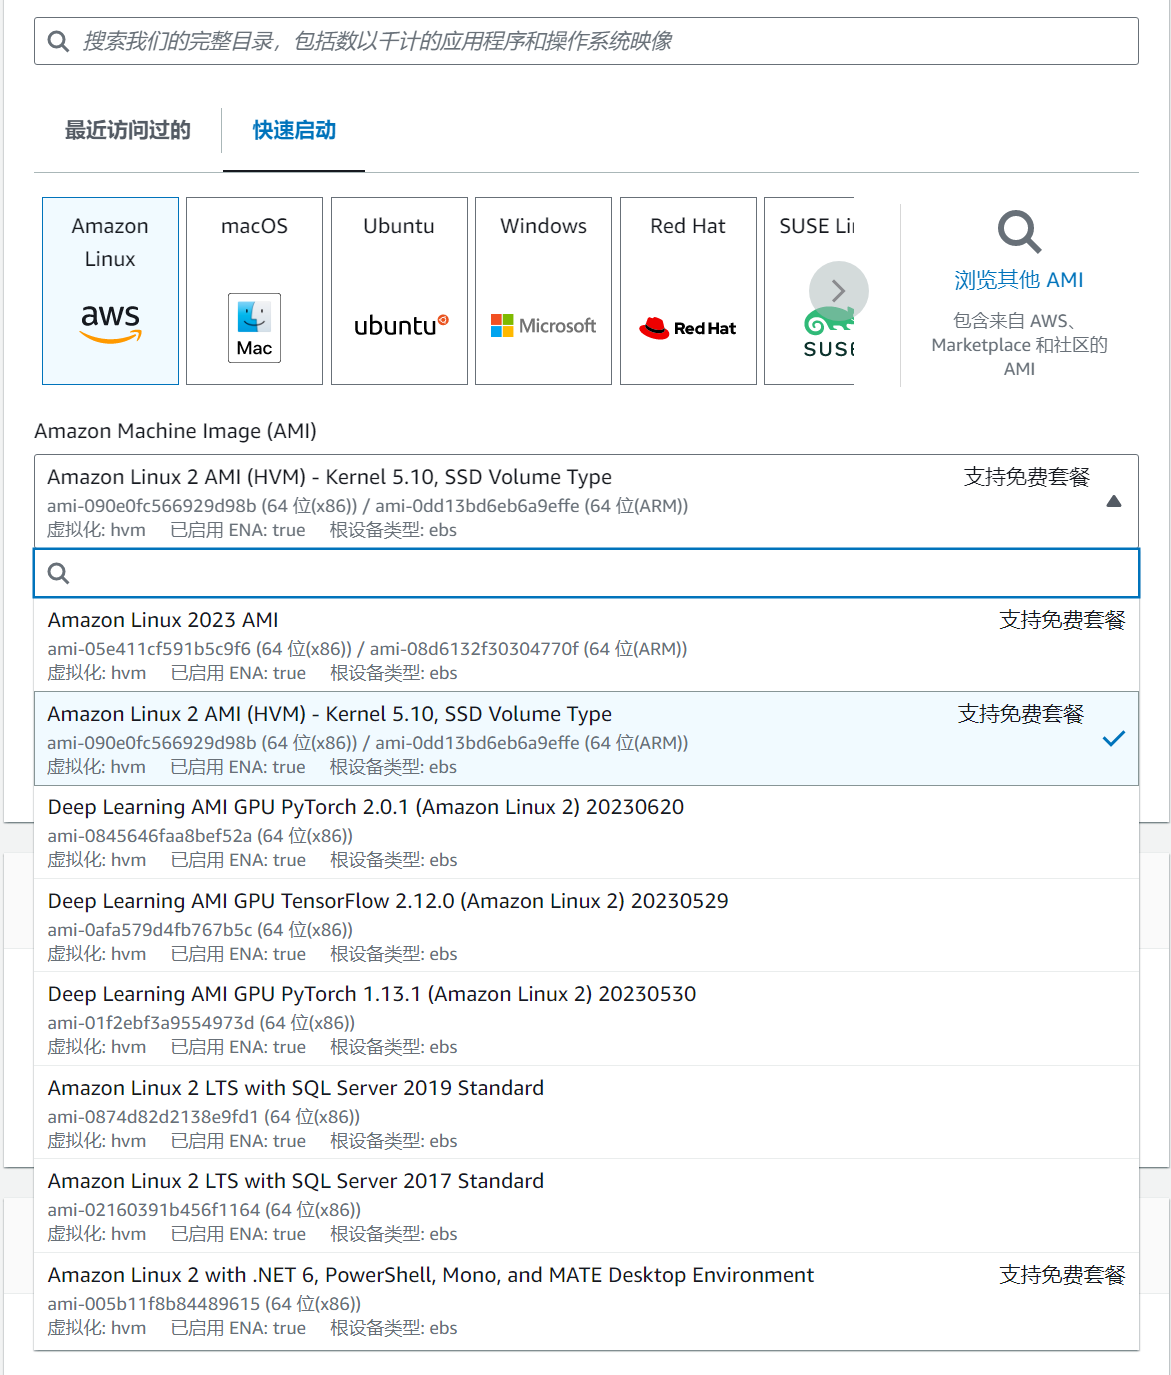
Select Amazon Linux 2 AMI as the operating system. (Amazon Linux 2023 AMI has some applications that cannot be installed, so I choose a lower but stable version of the operating system)
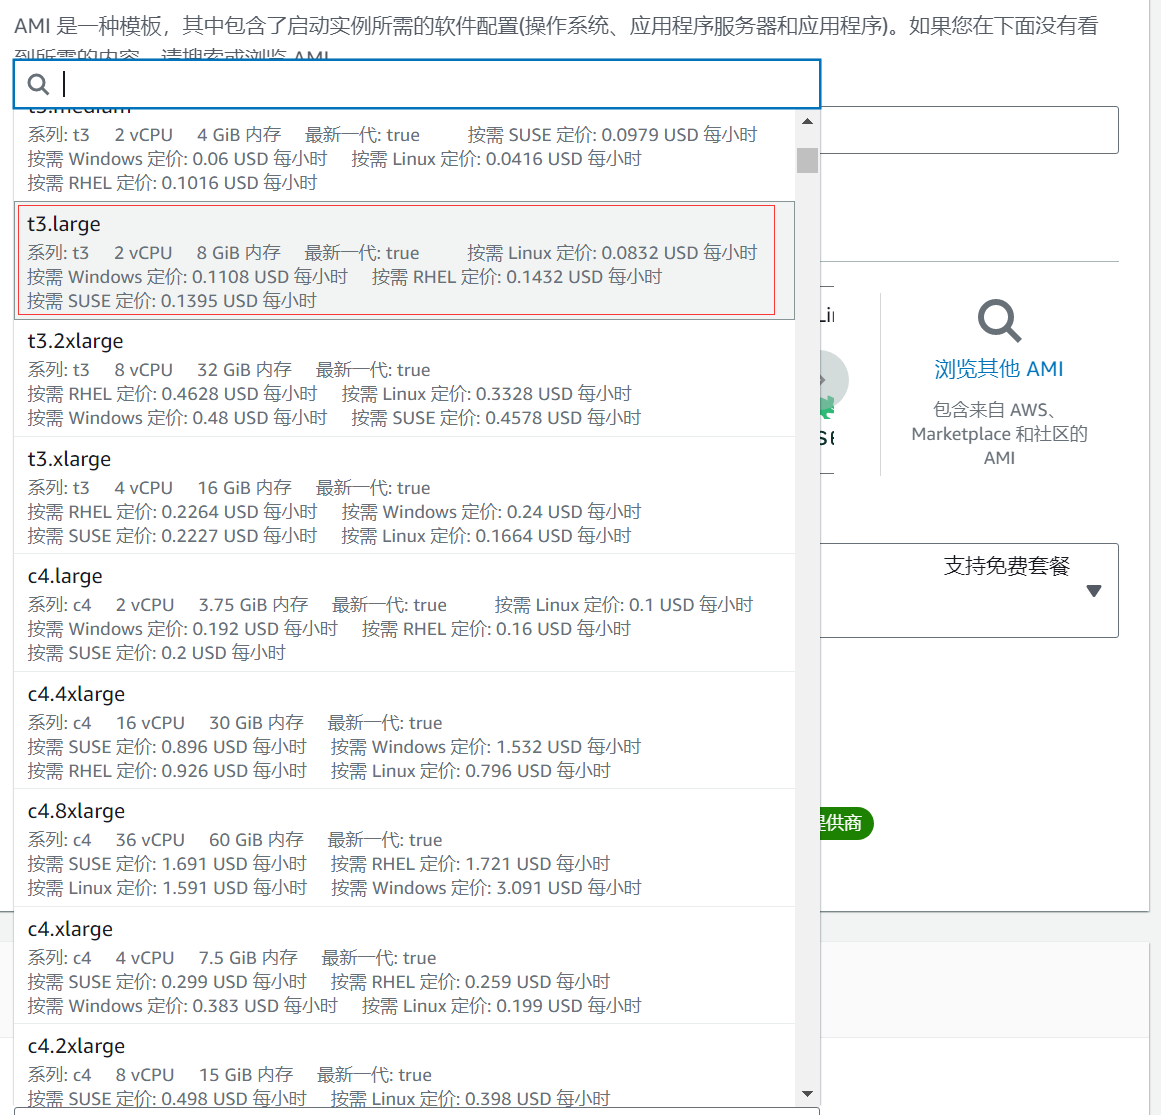
If you are just trying it out, it is recommended that you choose a t3.large (2C8G) machine for the minimum configuration.
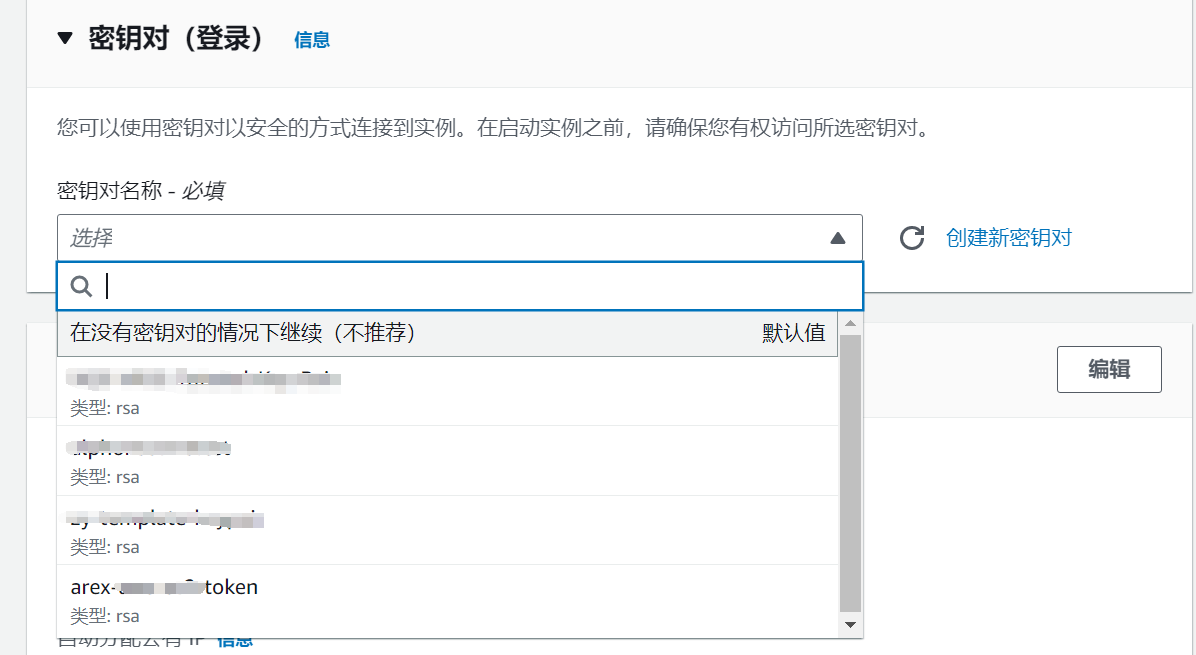
The Key pair can be created and used as you wish (for quick links to your EC2). You can also share this key when you create a DocumentDB later.
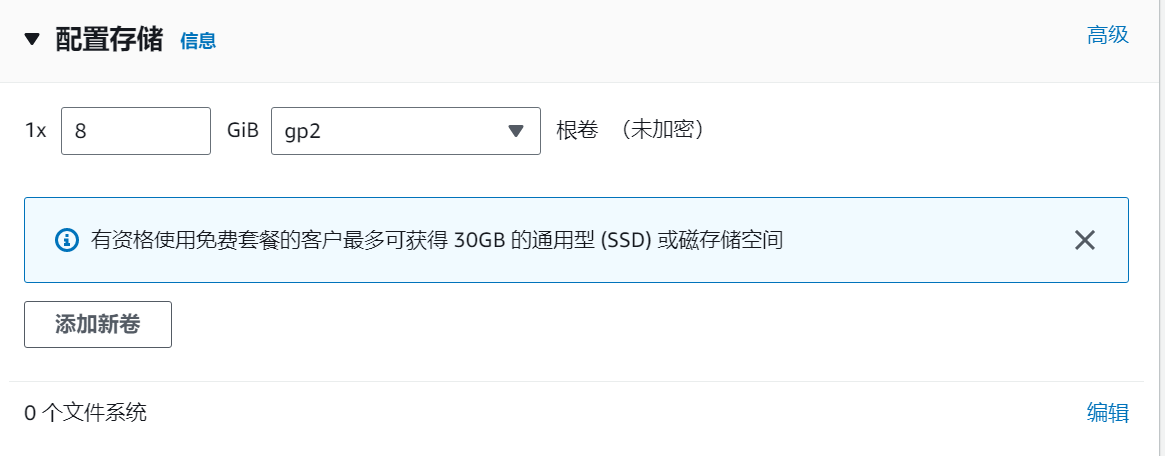
Storage Configuration selects 8G by default.
Step 2: Create Amazon DocumentDB Cluster
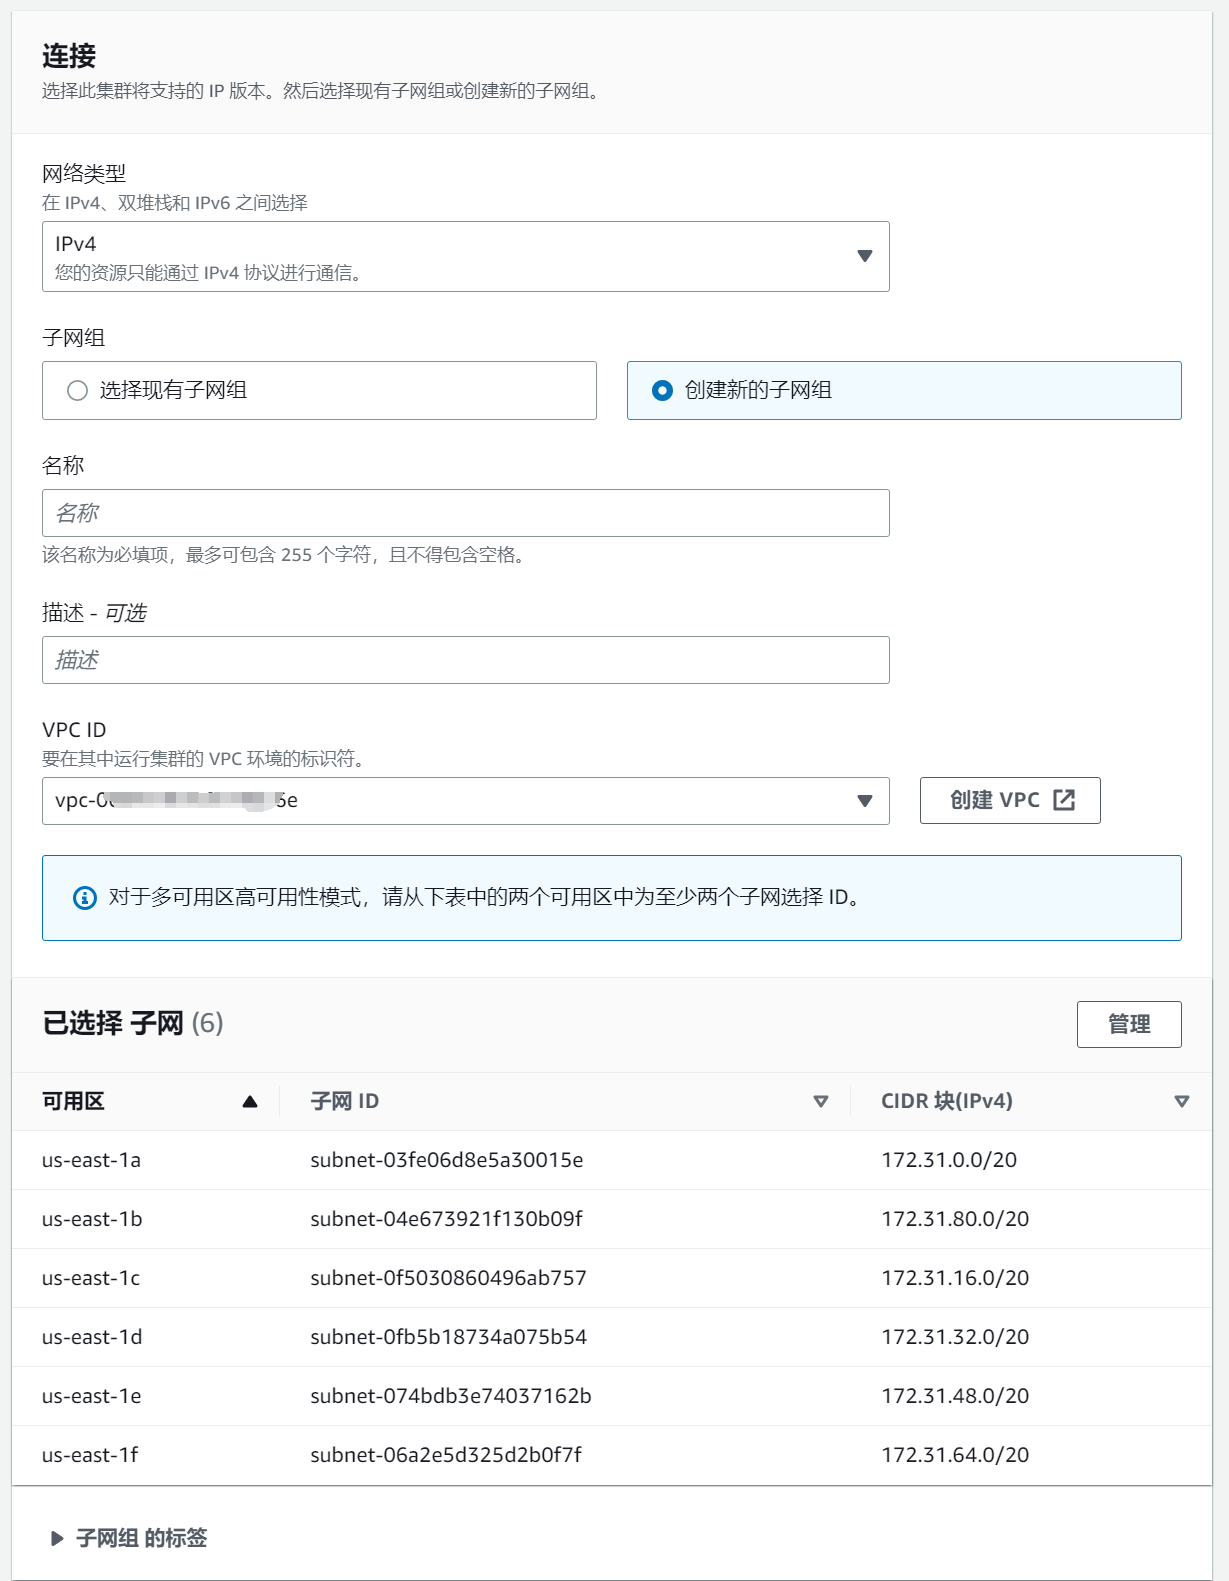
When using DocumentDB, you need to deploy it in the same virtual private cloud (VPC) where the EC2 instance it is associated with resides to ensure that they can communicate with each other.
Create 2 instances of type db.t3.medium, 1 master and 1 slave on two machines. Engine version chooses 5.0.0.
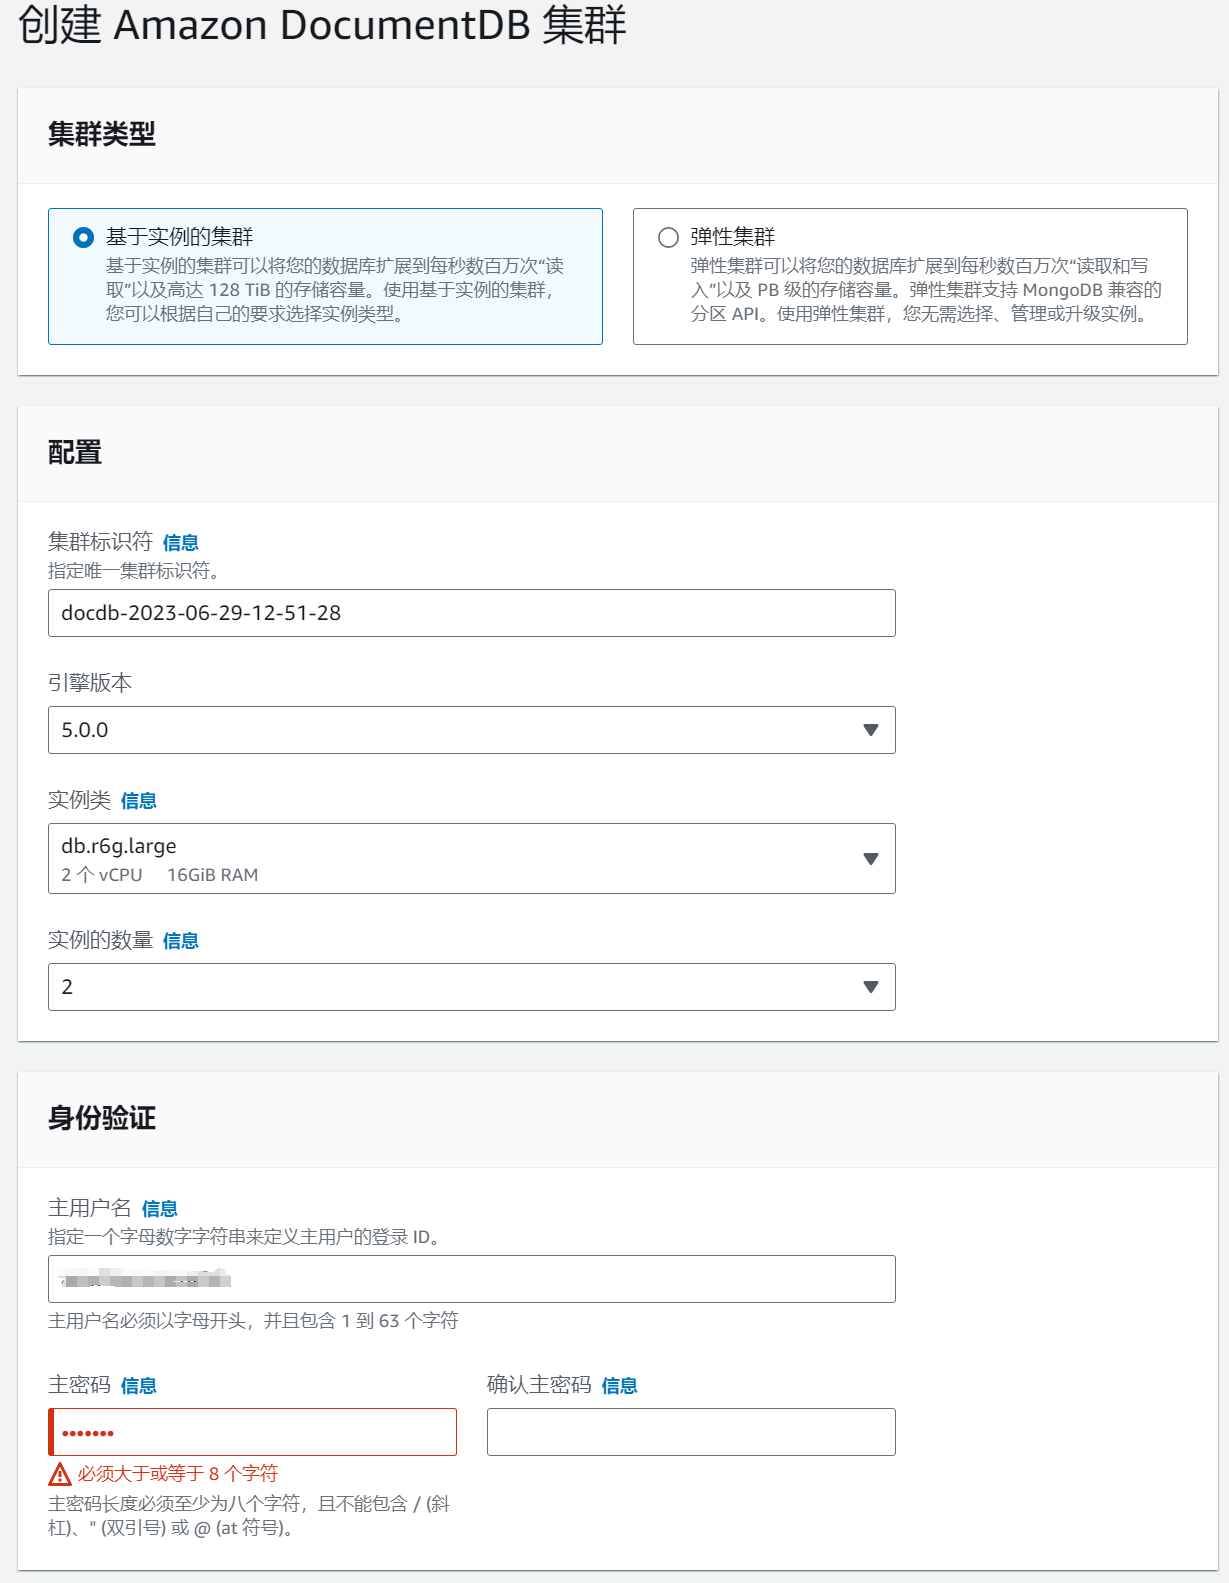
After installation, configure the corresponding inbound rules to allow external network access via the connection string. Use mongo shell to verify that the connection string is available.
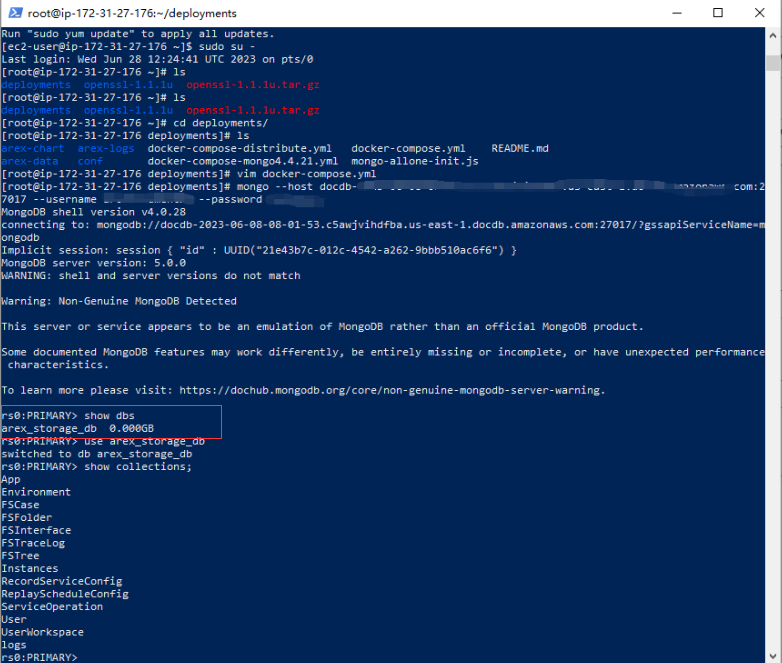
Run the show dbs command, and the figure above indicates that the DocumentDB was created successfully.
Step 3: Prepare an ElastiCache and Create a Redis Cluster
Search for ElastiCache in the AWS console and create a Redis cluster(ElastiCache must be in the same VPC as the EC2 created above).
Select the configuration and create a new cluster. You can disable cluster mode during the trial phase and modify the configuration as needed for official use.
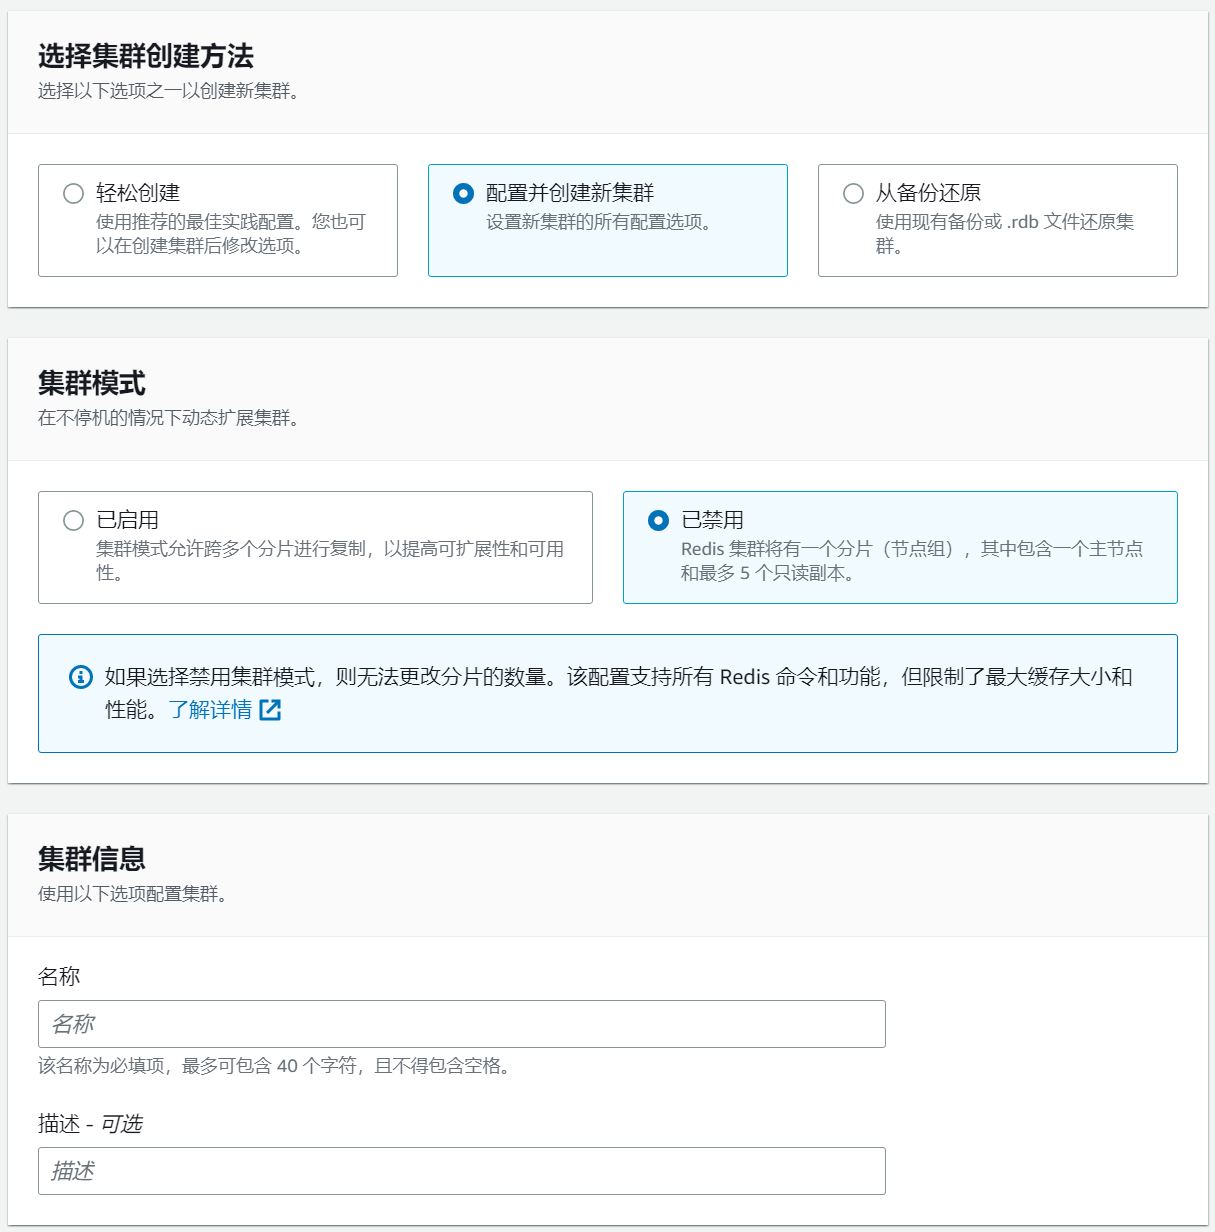
Engine version is selected as 6.2, node type is selected as cache.t3.micro, and the number of replicas is set to zero.
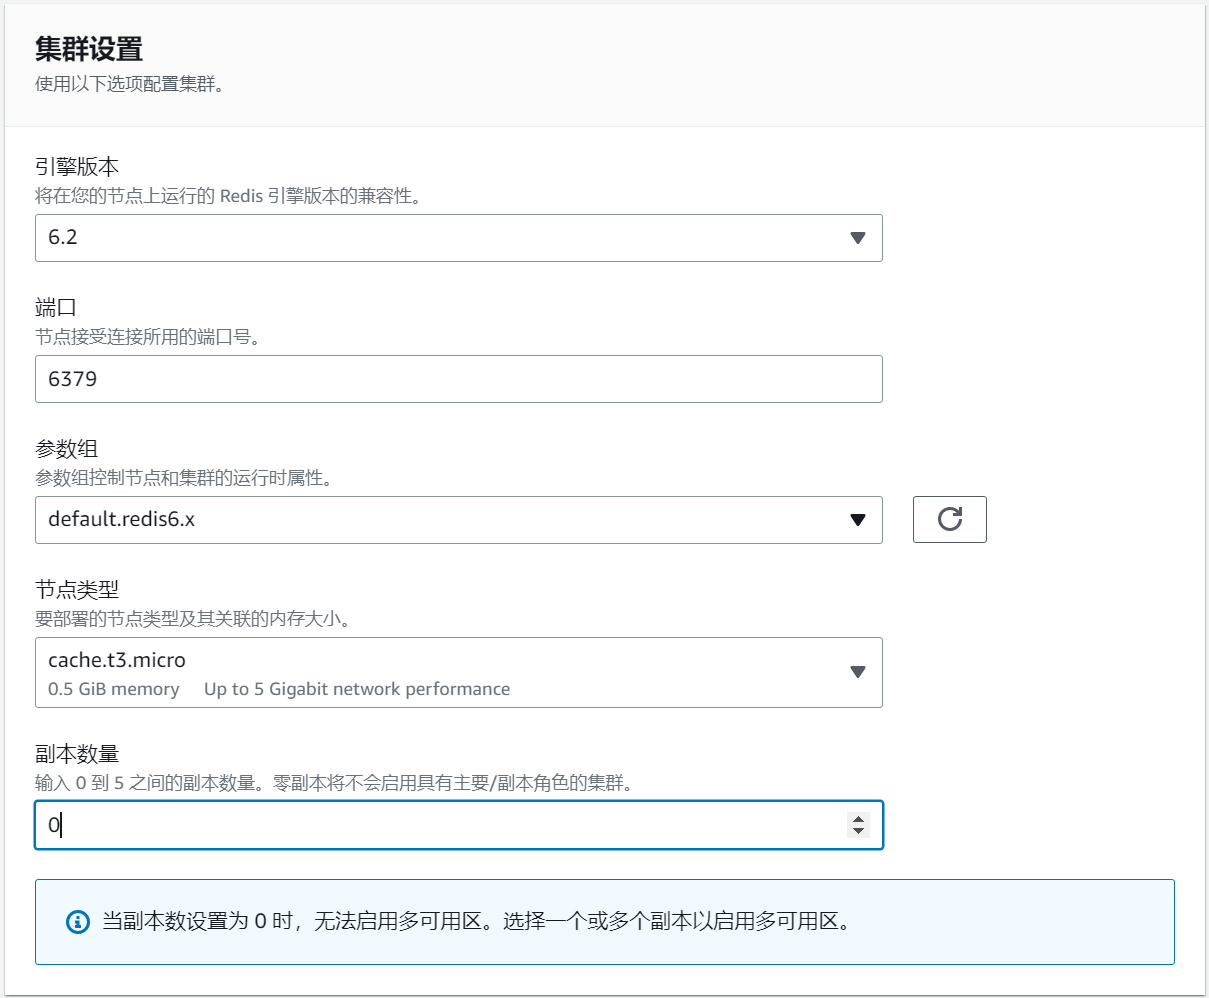
Select Create New Subnet Group and select the same VPC ID as EC2 above.
To check if the connection to ElastiCache is successful, you can use redis-cli to connect to ElastiCache on EC2. If the connection fails, you can check the inbound rules of the corresponding security group and configure them according to your network situation.

Step 5: Install AREX through docker-compose
Installing AREX is very simple. You can install all the basic service components of AREX with just one command using Docker-Compose.
Here is a brief introduction to the working principle and various service components of AREX.
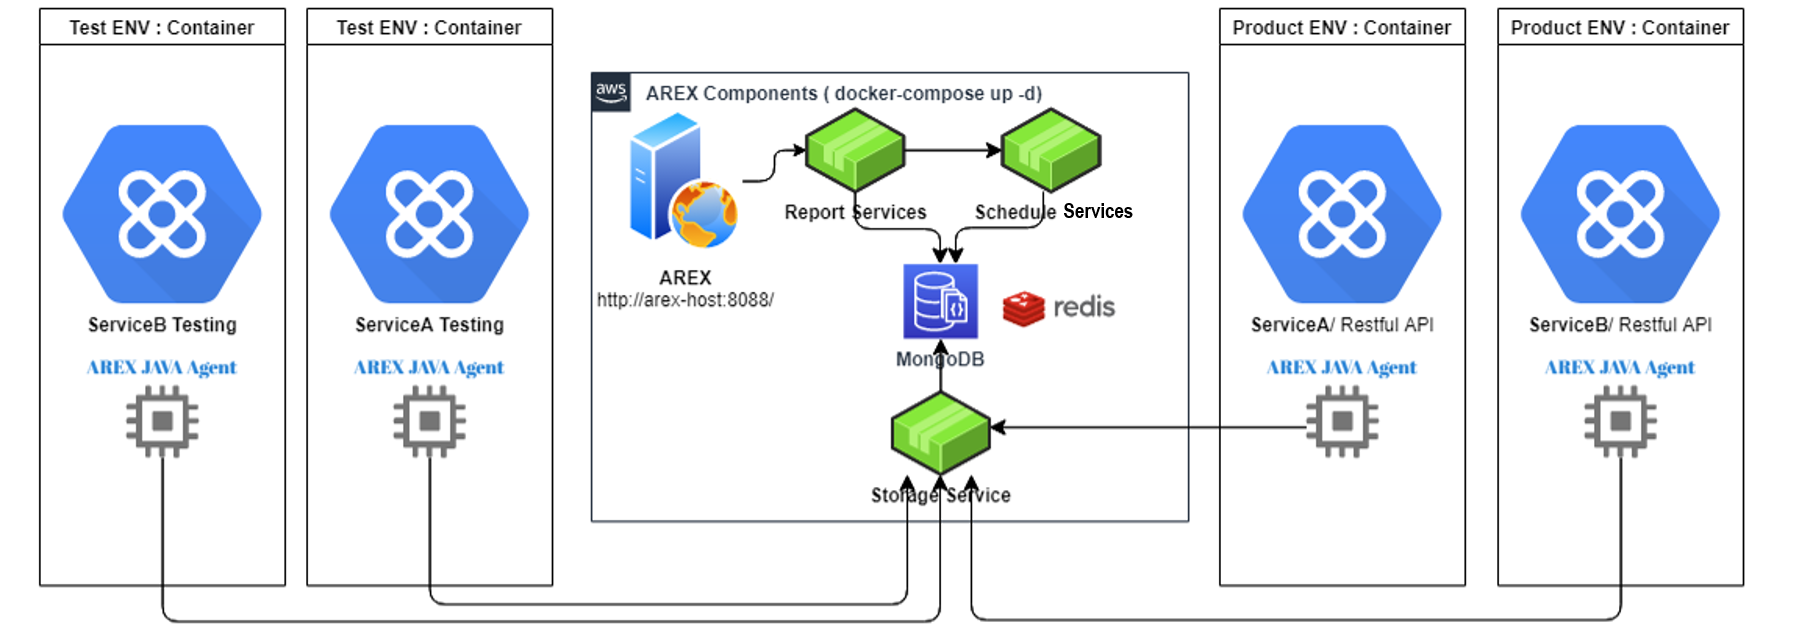
The working principle of AREX regression testing is to use AREX Java Agent to sample and record the data flow and request information of Java applications in the production environment, and send this information to the AREX Storage Service, which imports it into the database (mongoDB) for storage. When replay is required, the AREX Schedule Service will extract the recorded data of the tested application from the database through the Storage Service, and then send interface requests to the target verification service. At the same time, the Java Agent will mock the response of external dependencies recorded, instead of real data access, and convey it to the tested application. After the target service completes the request logic and returns the response message, the Schedule Service will compare the recorded response message with the replay response message to verify the correctness of the system logic, and sned the comparison result to the analysis service (Report Service), which generates a complete replay test report for testers to analyze the differences between recording and playback.
First, clone the AREX repository by git.
git clone --depth 1 https://github.com/arextest/deployments.git
cd deployments
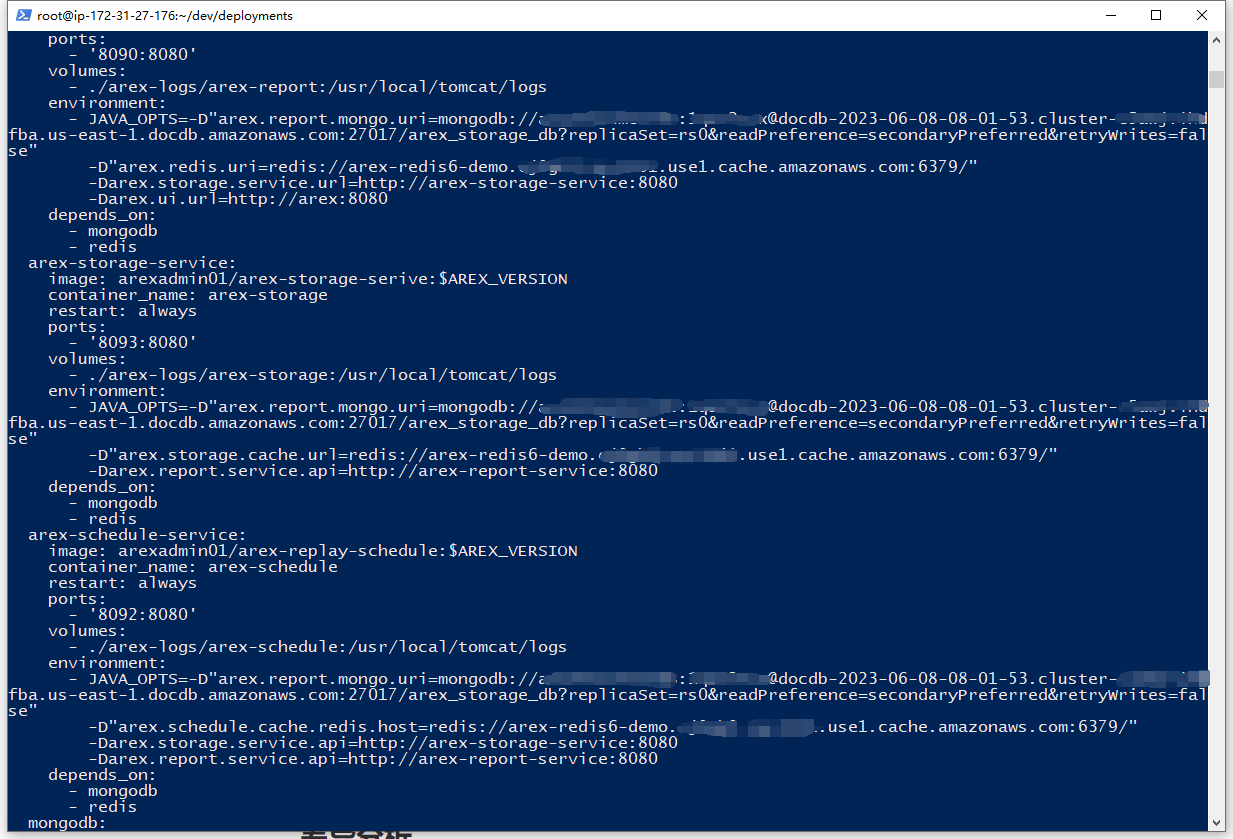
Configure DocumentDB and ElastiCache
If you want to use AWS DocumentDB as a database to replace the default MongoDB and use ElastiCache to replace the default Redis, you just need to modify the connection string in the docker-compose.yml configuration file. Replace all MongoDB connection strings with DocumentDB connection strings and all Redis connection strings with ElastiCache connection strings.
Step 5: Start AREX
After the configuration is complete, run docker-compose to start AREX.
docker-compose up -d
If you have not modified the port configuration, after the service is started, you can directly access the AREX frontend page by accessing port 8088.
Differences analysis
In actual use, for a complex online application with complex business scenarios and a huge number of recorded and replay test cases, analyzing differences and troubleshooting issues can be a challenge.
To reduce the workload of users when analyzing differences, AREX uses an aggregation method to greatly simplify the possible large number of differences.
Analysis of DiffScenes Aggregation
First is the aggregation of DiffScenes. AREX aggregates and displays multiple test cases with the same differential scenario. Before introducing the logic of differential scenario aggregation, let's briefly understand the basic concept of test cases in AREX.
AREX Case
In AREX, a test case usually consists of multiple steps, each step containing a request and a response. The request can be a main entry or an external call (including DB, Redis, etc.). In each step, information such as the request parameters and response results are recorded for subsequent comparison. If there are no differences in the response of the main entry and the requests of external dependencies during recording and playback, the test case is considered to have passed the replay test.
The main entry and external calls mentioned here are referred to as the type of Mock.
Types of Mock Difference
For each type of Mock, the types of comparison differences are divided into three categories:
New call: This difference type indicates that the Mock of the main entry or external call did not exist during recording, but exists during replay, indicating a new call, usually due to the iteration of new features.
Call missing: This indicates that the call existed during recording, but is missing during replay, usually because the project has been optimized and some unnecessary call relationships have been removed.
Value diff: This indicates that the node exists during both recording and playback, but there are differences in some nodes during the comparison process. The following chapters will specifically introduce how to analyze these differences.
Aggregation of DiffScenes
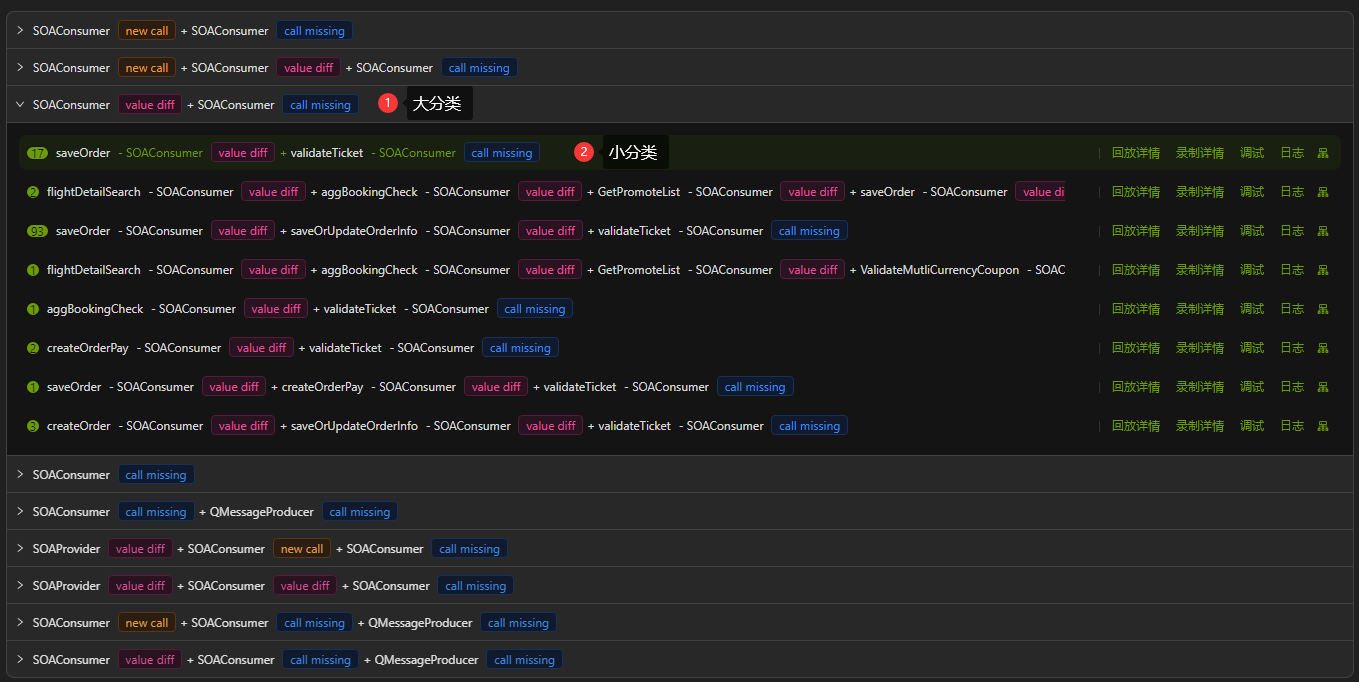
During traffic replay testing, for cases where there may be a large number of test cases, AREX will use some aggregation operations to merge similar test cases to reduce the number of differences and facilitate data analysis. As shown in the figure below, after aggregating similar different scenes, only one test case is selected for display under each DiffScenes.
Aggregation Logic of DiffScenes
With the above concept of Mock Difference Types, the aggregation logic of diffScenes is introduced next. DiffScene is designed to aggregate use cases with the same mock type and difference type together to form a scenario, so as to help users understand the use cases in the whole scenario more quickly, reduce the number of use cases users need to analyze, and improve the efficiency of analyzing use cases.
First, based on the combination of Mock type and difference type, AREX generates a unique key into which all use case categories are aggregated to form a grand classification. As labeled in the figure above ①Major Classification.
Secondly, each use case in the broad categorization is further categorized by generating another subunique key based on the arrangement of the specific mock and difference types. The purpose is to categorize the use cases in a more granular way so that the variance use cases can be analyzed more quickly, as can be seen in the example in the figure above for ② Subcategories. The number of use cases in each subcategory is labeled at the top of the category.
Analysis of Differences
In each DiffScene, AREX displays aggregation for similar difference nodes as well.
Aggregation Logic of Differences
In some scenarios with large messages, there will be a lot of difference nodes in some large arrays, which on one hand is not conducive to front-end display, and on the other hand increases the complexity of analyzing the discrepancy points for the user.
In order to solve this problem, AREX aggregates the differences according to the fuzzy path. Fuzzy paths refer to JSON node paths without array subscripts. For example, a JSON object has an array named "items" with multiple elements "items[0]", "items[1]", "items[2]", etc. In fuzzy paths, these paths will be merged into "items" to achieve aggregation.
New nodes
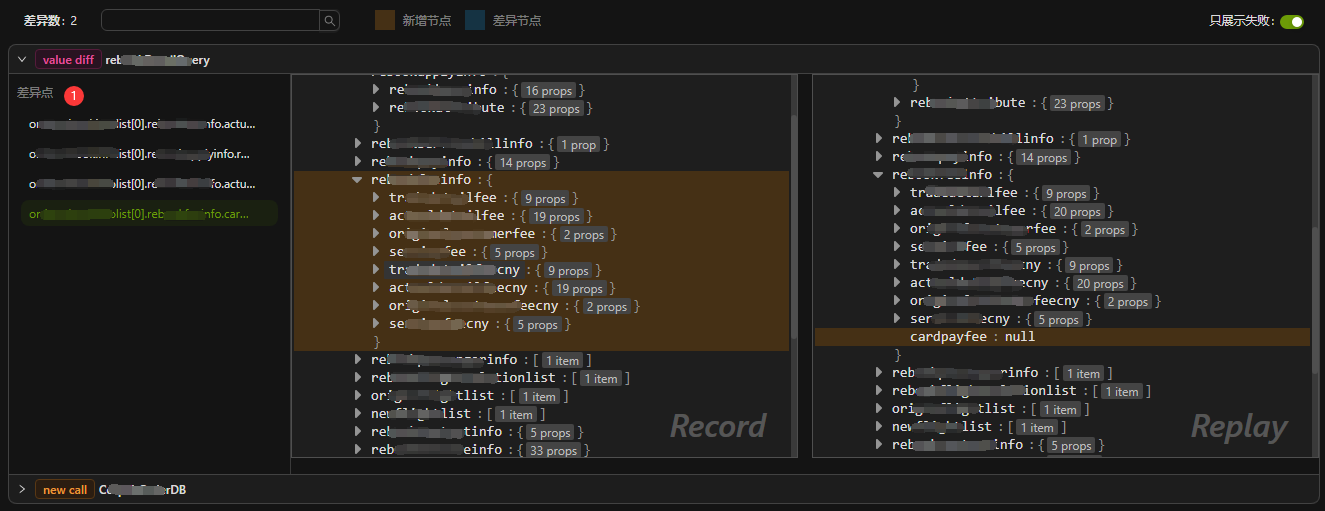
When comparing two JSON objects, if a node exists in one side of the JSON object, but not in the other side, then we consider that node to be a "new node". As shown in the following figure, cardpayfee only appears in the node in the right side of the object. To make it easier for the user to note, AREX highlights all the ancestors of the new node by coloring them brown. In this way, the user can clearly see the position of the node in the object on the other side and better analyze the problem.
Difference nodes
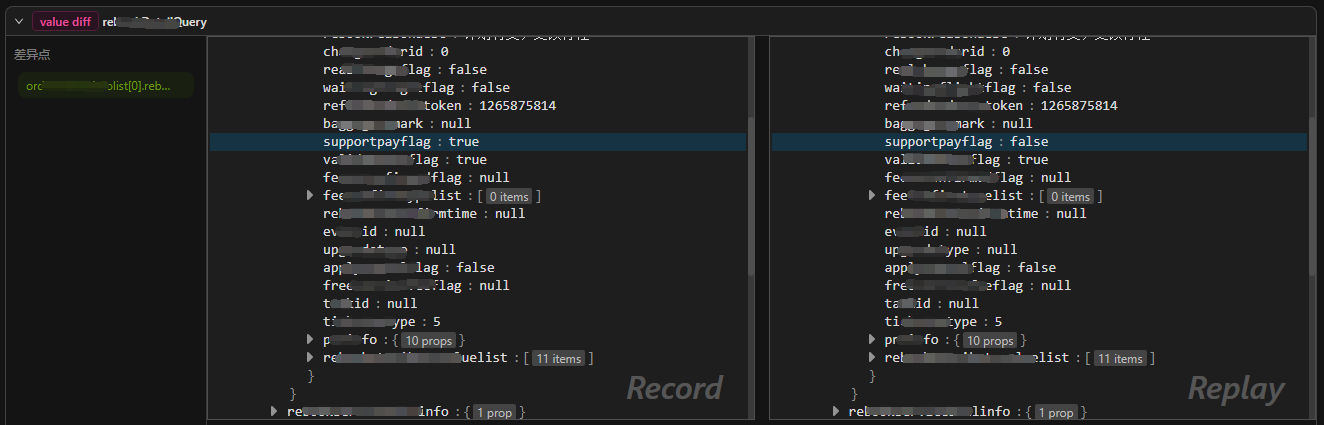
If a node exists in both the left and right objects but their values are different, it can be considered as a "Difference nodes". AREX will highlight these nodes with blue background. Unlike new nodes, this type of difference only occurs in leaf nodes because only leaf nodes have specific values that can be compared.